Accessibility Reader in macOS Tahoe transforms any app into a distraction-free reading environment with customizable fonts, colors, spacing, and built-in text-to-speech. To start using it immediately, open System Settings, navigate to Accessibility, then Read & Speak, and toggle Accessibility Reader on. Once enabled, press Command-Escape from anywhere in macOS to launch it for the currently focused window.
Key Takeaways
- Press Command-Escape to activate Accessibility Reader from any app
- Customize font size, style, color, line spacing, and background in the settings panel
- Use the play button to have text read aloud at adjustable speeds
- Triple-press Touch ID to access the Accessibility Shortcut menu on supported Macs
- Accessibility Reader works in every macOS app, not just Safari
- Find the feature under System Settings, then Accessibility, then Read & Speak
| Feature | What It Does | Who Benefits Most |
|---|---|---|
| Full-Screen Reading View | Strips away interface clutter | Anyone facing visual distractions |
| Text Customization | Adjusts font, size, color, spacing | Low vision users, readers with dyslexia |
| Text-to-Speech | Reads content aloud at variable speeds | Multitaskers, auditory learners |
| Universal App Support | Works across the entire system | Everyone who reads on a Mac |
Why Accessibility Reader Matters Beyond Vision Needs
Accessibility Reader ships as part of macOS Tahoe's expanded accessibility toolkit, which also includes the Magnifier app, Braille Access, and Vehicle Motion Cues. But labeling it "accessibility-only" undersells what it can do for anyone who spends hours reading on a Mac. The feature functions like Safari's Reader View, except it works everywhere: Mail, Notes, PDFs in Preview, web articles in Chrome, documentation in Xcode, and beyond.
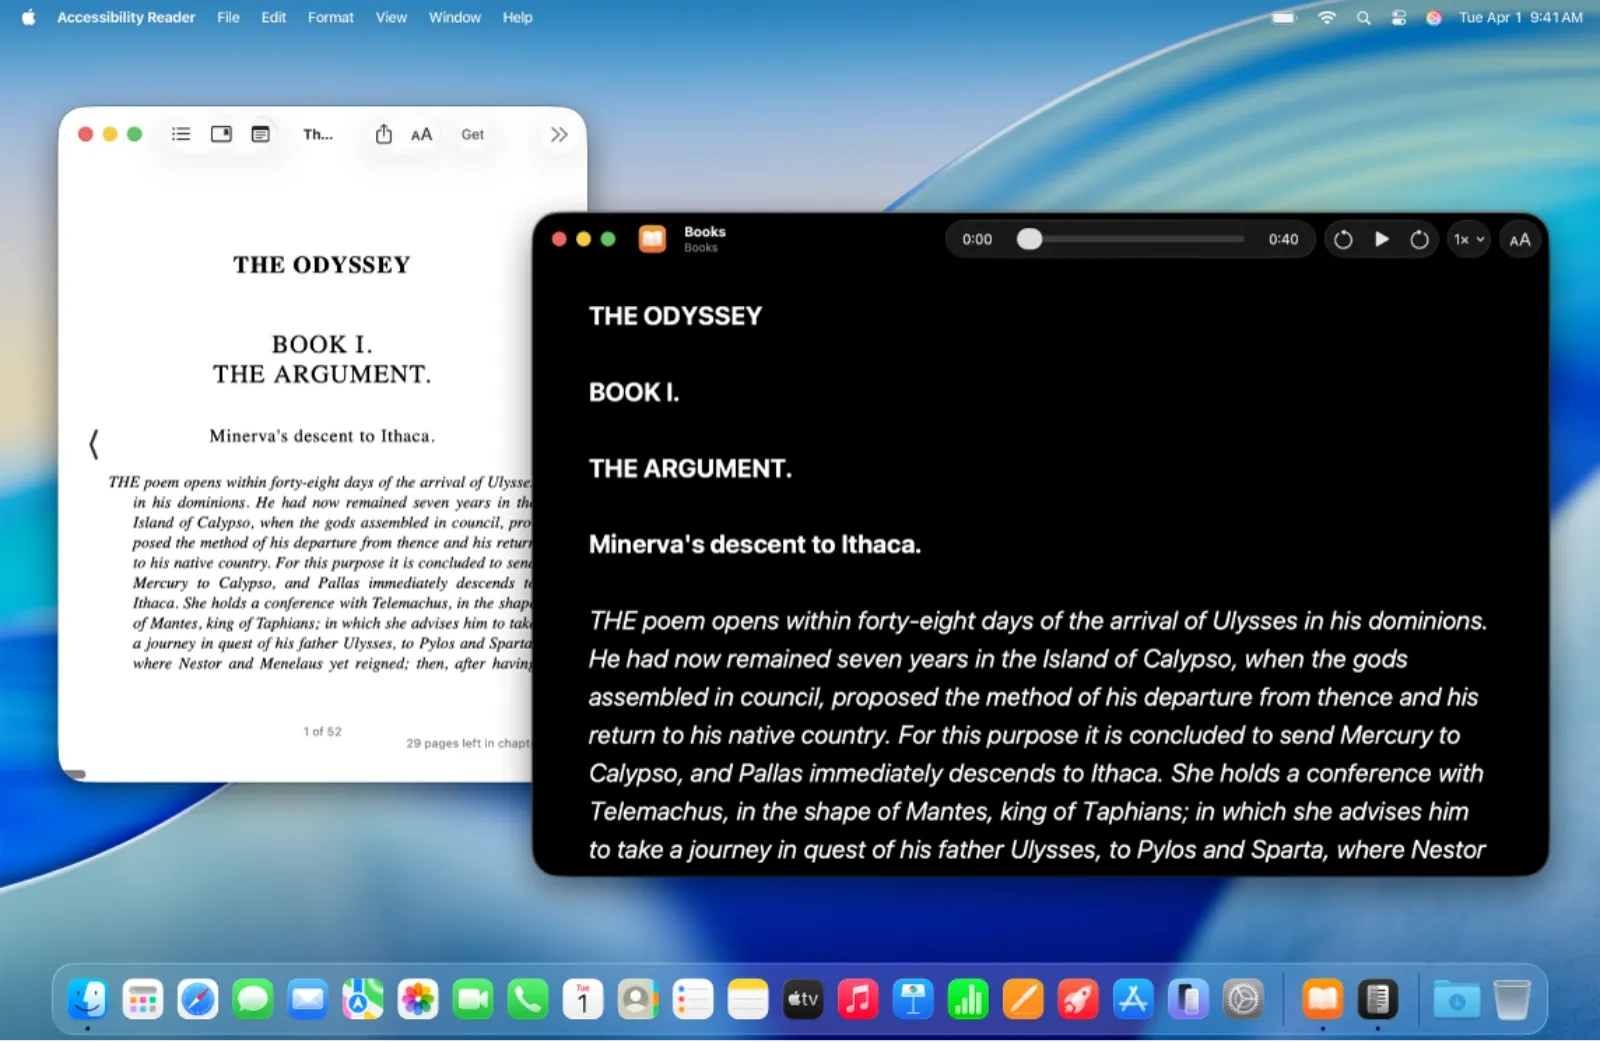
When you activate Accessibility Reader, macOS extracts the text from your current window and presents it in a clean, full-screen layout. The interface eliminates sidebars, ads, navigation elements, and other visual noise. What remains is your content, displayed in the way that suits your eyes and reading preferences.
Setting Up and Launching Accessibility Reader
Head to System Settings by clicking the Apple menu in the top-left corner of your screen. Select Accessibility from the sidebar, then choose Read & Speak. Toggle Accessibility Reader on at the top of this section.
The default keyboard shortcut is Command-Escape. Pressing this combination from any app launches Accessibility Reader for the currently focused window. If you prefer a different trigger, click the information button next to the Accessibility Reader toggle to assign a custom keyboard shortcut.
You can also access Accessibility Reader through the Accessibility Shortcut. On Macs with Touch ID, triple-press the Touch ID button to open this menu. On Macs without Touch ID, press Option-Command-F5. If Accessibility Reader appears in your shortcut list, selecting it launches the reader immediately.
Customizing the Reading Experience
Once Accessibility Reader is active, tap the AA button in the interface to open the customization panel. Options include theme selection (light, dark, sepia, and others), font choice, text size adjustments, line spacing controls, and column width settings.
Readers with light sensitivity often benefit from the sepia or dark themes, which reduce glare and harsh contrast. Those with dyslexia may prefer fonts like OpenDyslexic or increased letter spacing to improve word recognition. The customization panel saves your preferences, so you only need to configure it once.
The text-to-speech function activates when you press the play button. A progress indicator tracks the current reading position, and you can skip forward or backward using the transport controls. Speed adjustment works in real time, so you can slow down for complex technical material or speed up for casual reading.
How Accessibility Reader Helps Cognitive Accessibility
Cognitive accessibility extends beyond vision. Reducing visual clutter can benefit readers with ADHD who struggle with distraction, or anyone processing dense material after a long workday. Accessibility Reader strips the information architecture down to essentials: just text, in the format that works for you.
When I tested the feature with a long technical document, the difference in reading fatigue was noticeable. The original PDF had cramped margins, a small serif font, and competing navigation elements. Accessibility Reader rendered the same content with generous spacing, a sans-serif face, and nothing else on screen. Reading became less about hunting for the next line and more about absorbing the material.
| NLM Spotlight | Product | Why We Love It | Price |
|---|---|---|---|
 | Check Price |
Affiliate disclosure: some links in this article are Amazon Associate links. If you buy through them, Next Level Mac may earn a small commission at no extra cost to you, and we only recommend products that genuinely bring value to your Mac setup.
Reducing Eye Strain with Proper Workspace Lighting
Software features like Accessibility Reader address part of the eye comfort equation, but ambient lighting plays an equally important role. Staring at a bright screen in a dark room creates harsh contrast that fatigues your eyes over time. Traditional desk lamps often reflect off the screen, creating glare that compounds the problem.
Monitor light bars solve this by illuminating your desk and keyboard without casting light directly at your display. They mount on top of your monitor, angling light downward with asymmetric optics that prevent screen reflections. The result is balanced illumination that reduces the contrast between your screen and surroundings.
Where to buy the BenQ ScreenBar, a USB-powered monitor light with auto-dimming, adjustable color temperature from 2700K to 6500K, and a patented clamp that fits monitors 1 to 3 centimeters thick: https://www.amazon.com/dp/B076VNFZJG?tag=nextlevelmac-20
The BenQ ScreenBar draws power from any USB-A port, including those on your Mac or external monitor. A built-in ambient light sensor detects room brightness and adjusts output to maintain 500 lux on your desk, which meets the American National Standard for office lighting. Touch controls on the bar itself let you manually adjust brightness and color temperature if you prefer warmer light for evening reading sessions. The asymmetric optical design keeps your screen completely free of reflections, which pairs naturally with Accessibility Reader's glare-free text presentation.
Accessibility & Clarity: Evaluating the Feature
Accessibility Reader earns high marks for VoiceOver compatibility. The reading interface announces its controls properly, and text-to-speech works seamlessly alongside VoiceOver navigation. Users who rely on Braille displays will find that the text content renders correctly, though the customization panel requires some exploration to navigate efficiently.
For low vision users, the font scaling and high-contrast themes address common pain points. The ability to set a dark background with light text helps readers with photophobia or migraines triggered by bright screens. Column width controls prevent long lines that force excessive eye movement.
One edge case worth noting: Accessibility Reader performs better with text-heavy content than with heavily formatted documents. Tables, code blocks, and complex layouts sometimes lose their structure when rendered in the reader view. For these cases, the original document may work better with macOS zoom features instead.
The cognitive accessibility angle matters too. By removing sidebars, pop-ups, and navigation clutter, Accessibility Reader creates a predictable reading environment. There are no distracting calls-to-action or nested menus to increase cognitive load. The interface remains static until you decide to scroll.
Integrating Accessibility Reader Into Your Workflow
Consider building Accessibility Reader into your research workflow. When gathering information from multiple sources, launch the reader for each article or document. The consistent visual formatting reduces context-switching fatigue as you move between sources.
If you frequently read in Preview, Accessibility Reader offers a significant upgrade over the default PDF viewing experience. Preview's layout depends on the original document design, which varies wildly in quality. Accessibility Reader normalizes the experience, presenting every PDF with your chosen typography.
For those exploring Mac accessibility for the first time, Apple's support documentation provides additional context on related features. The macOS Tahoe accessibility suite includes tools like Zoom, Hover Text, and Reduce Motion that complement Accessibility Reader. You can layer multiple features to create a reading environment tuned precisely to your needs. For a deeper look at customizing Liquid Glass readability, check out our guide on making Liquid Glass easier to read on your Mac at https://www.nextlevelmac.net/make-liquid-glass-easier-to-read-on-your-mac/.
Quick-Action Checklist
- Open System Settings from the Apple menu
- Select Accessibility in the sidebar
- Choose Read & Speak
- Toggle Accessibility Reader on
- Press Command-Escape to launch the reader in any app
- Click the AA button to customize fonts, colors, and spacing
- Press the play button to hear text read aloud
- Adjust reading speed with the 1x button

Related Posts
Mac Accessibility for Dyslexia: Fonts, Tools, and Settings That Make Reading Easier
Jan 15, 2026
VoiceOver Keyboard Shortcuts Transform Mac Accessibility
Jan 15, 2026
Use AirPods Pro 3 as Hearing Aids on Your Mac in macOS Tahoe
Jan 14, 2026