Finder Quick Actions transform how you handle files on your Mac. Instead of opening apps, navigating menus, and clicking through dialogs, you select files in Finder and execute operations immediately from the Preview pane or a right-click menu. The actions run in the background, and your processed files appear ready to use.
Key Takeaways
- Access Quick Actions by right-clicking files or using the Preview pane in Finder (View > Show Preview)
- Built-in actions include Rotate, Markup, Create PDF, Remove Background, and Trim for media files
- Create custom Quick Actions using Automator by selecting Quick Action as your workflow type
- Add shortcuts to Quick Actions through System Settings > Privacy & Security > Extensions > Finder
- Assign keyboard shortcuts to frequently used Quick Actions in System Settings > Keyboard > Keyboard Shortcuts
- Quick Actions run without opening external apps, keeping your workflow uninterrupted
At-A-Glance: Quick Actions vs. Opening Apps
The following table compares completing common file tasks using Quick Actions versus the traditional method of opening applications.
| Task | Quick Actions Method | Traditional Method |
|---|---|---|
| Rotate an image | One click in Preview pane | Open Preview, use menu, save |
| Convert images to PDF | Select files, click Create PDF | Open each in Preview, export individually |
| Remove image background | One click, automatic processing | Open Photos or third-party app, manual edit |
| Batch rename files | Custom Automator action | Third-party app or Terminal commands |
Quick Actions deliver the same results with fewer steps and no app-switching interruptions.
How to Access Quick Actions in Finder
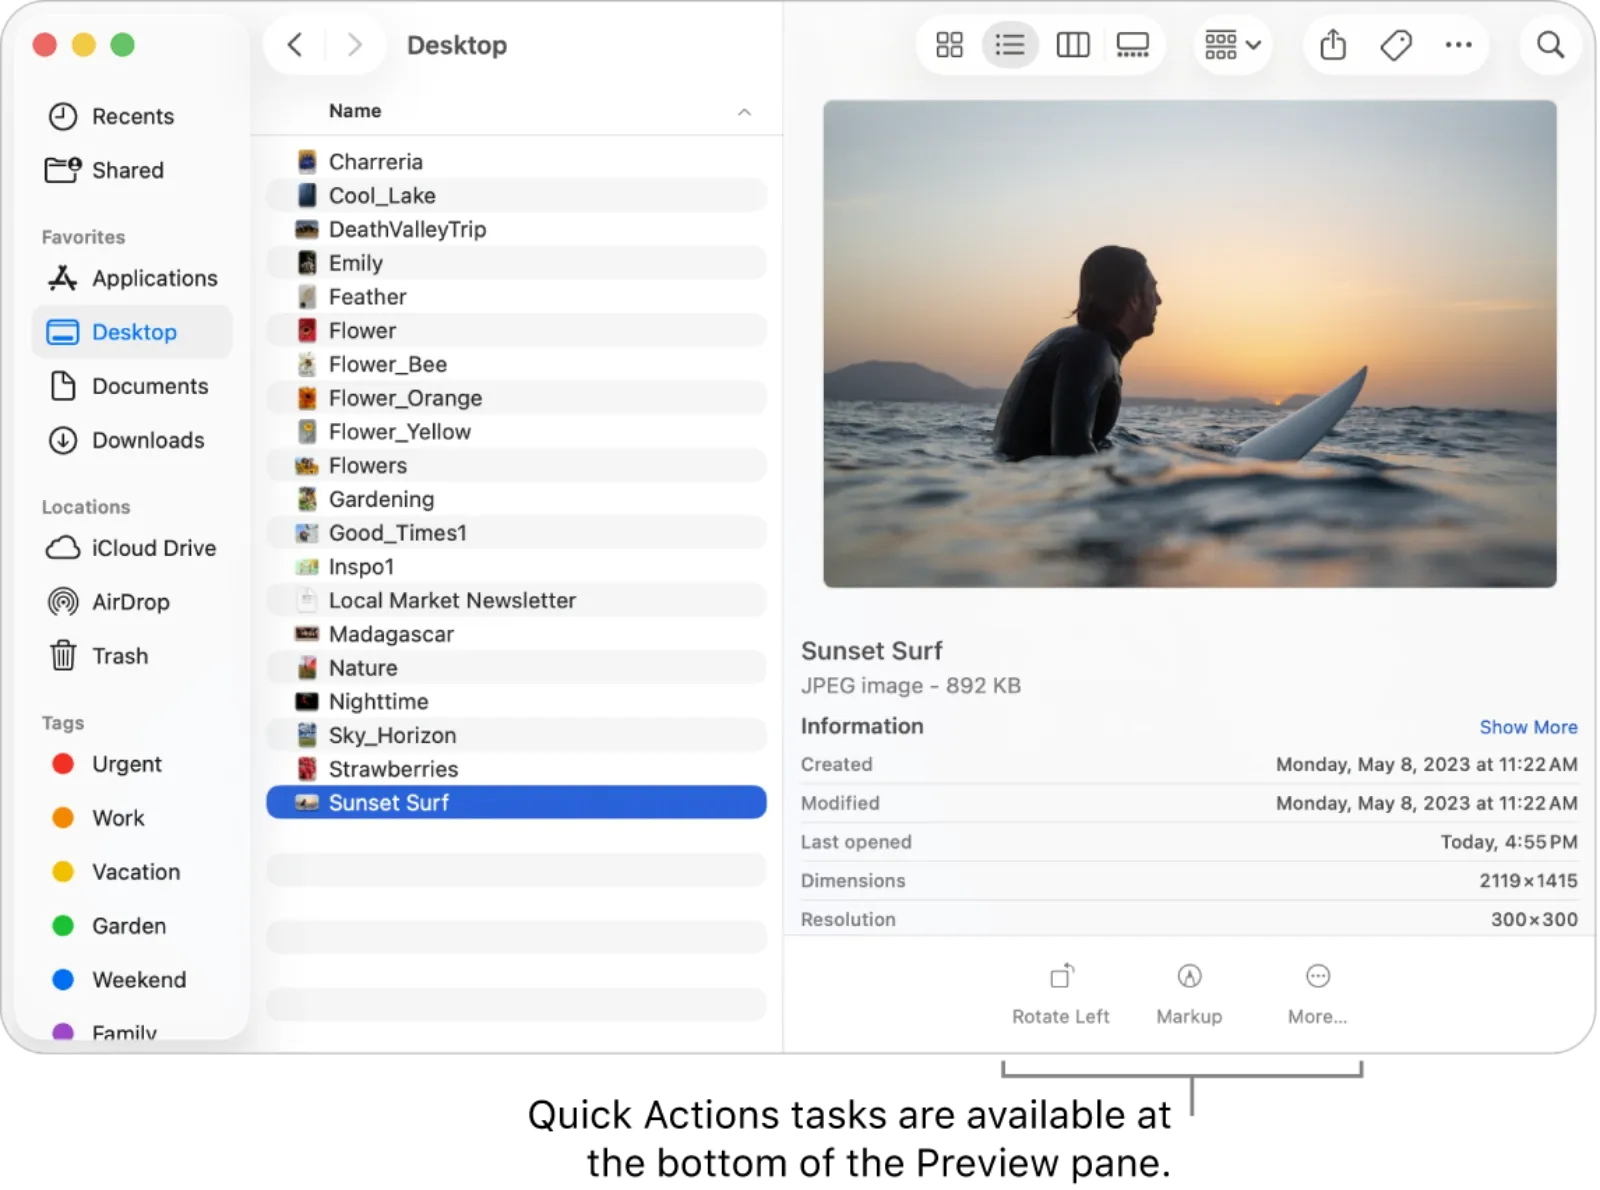
Finder surfaces Quick Actions in two locations. The Preview pane displays them at the bottom when you select compatible files. To enable the Preview pane, open any Finder window and choose View from the menu bar, then click Show Preview. The panel appears on the right side of your window, showing file metadata and available actions beneath the preview thumbnail.
Right-clicking files reveals Quick Actions in the contextual menu. Control-click (or two-finger tap on a trackpad) any file, hover over Quick Actions in the menu, and the available operations appear in a submenu. This method works regardless of whether the Preview pane is visible.
The actions that appear depend on your file selection. Selecting images shows Rotate, Markup, Create PDF, and Remove Background. Selecting video files shows Trim. Audio files offer conversion options. Multiple file selections filter the available actions to those compatible with all selected items.
Built-In Quick Actions Worth Using
macOS Tahoe includes several Quick Actions that handle common tasks without additional software.
Rotate adjusts image orientation in 90-degree increments. Each click rotates the image counterclockwise. The change applies directly to the file.
Markup opens a floating editor for annotations. Draw shapes, add text, sign documents, or highlight areas. The edited file saves automatically when you close the Markup window.
Create PDF combines selected images or documents into a single PDF file. The action processes files in the order Finder displays them, so sort your selection before running the action if sequence matters.
Remove Background uses machine learning to isolate subjects from their backgrounds. The feature works best with clear subject-background contrast and produces transparent PNG files.
Trim cuts video or audio files to specific segments. A timeline appears with handles for setting in and out points. This Quick Action preserves the original file and creates a trimmed copy.
Creating Custom Quick Actions with Automator
Automator lets you build Quick Actions tailored to your specific needs. Open Automator from Applications (or search for it using Spotlight with Command-Space), then click New Document. Select Quick Action from the template options and click Choose.
The workflow configuration area appears at the top of the window. Set "Workflow receives current" to the file type your action handles, such as "files or folders," "images," "PDFs," or "documents." Set the application dropdown to "Finder" to make your action available in Finder windows.
Drag actions from the library on the left into the workflow area on the right. Actions execute sequentially from top to bottom. Each action receives input from the previous one and passes its output to the next.
For example, to create a Quick Action that watermarks PDF documents: search for "Watermark PDF Documents" in the action library, drag it into the workflow, configure your watermark image and transparency settings, then add "Open Finder Items" as a second action to display the result in Preview. Save the workflow with a descriptive name. Your new Quick Action appears immediately in Finder.

Affiliate disclosure: some links in this article are Amazon Associate links. If you buy through them, Next Level Mac may earn a small commission at no extra cost to you, and we only recommend products that genuinely bring value to your Mac setup.
Adding Shortcuts to Quick Actions
The Shortcuts app can feed directly into Finder Quick Actions. Open Shortcuts, locate or create the shortcut you want available in Finder, then drag it from the main window onto "Quick Actions" in the sidebar. Your shortcut now appears alongside built-in Quick Actions when you right-click compatible files.
For shortcuts you run frequently, assign keyboard shortcuts through System Settings. Navigate to Keyboard, then Keyboard Shortcuts, then Services. Find your custom Quick Action under Files and Folders or the appropriate category, double-click the shortcut column, and press your desired key combination.
Practical Quick Action Workflows
Batch image conversion handles format changes efficiently. Create an Automator Quick Action that receives image files, add the "Change Type of Images" action, select your target format (JPEG, PNG, HEIC, TIFF), and optionally add "Copy to Clipboard" or "Move Finder Items" to organize outputs. Processing dozens of screenshots for web use takes seconds instead of minutes.
Document archiving combines files with organization. Build a Quick Action that receives any file type, adds "Create Archive" to compress the selection, then moves the archive to a specific folder like Documents/Archives. Pair this with date-based naming using "Rename Finder Items" for automatic organization.
Image resizing for email or web uploads prevents sending oversized files. Add "Scale Images" to your workflow, set the target dimensions or percentage, and optionally add quality adjustments. Running this action on a batch of photos before attaching them to messages saves upload time and recipient bandwidth.
Accessibility and Clarity
Quick Actions benefit users with motor limitations by reducing the number of precise cursor movements required to complete tasks. Instead of navigating through application menus, drilling into submenus, and clicking dialog buttons, a single click or keyboard shortcut completes the entire operation.
For users relying on VoiceOver, Quick Actions appear as labeled buttons in the Preview pane. VoiceOver announces each available action when navigating the pane with the keyboard. Custom Quick Actions inherit their name from the Automator workflow filename, so using clear, descriptive names improves screen reader navigation. Name your workflow "Convert Images to PNG" rather than "Image Processing v2" to make VoiceOver announcements meaningful.
The reduced cognitive load also helps users who find complex multi-step workflows difficult to remember or execute consistently. A Quick Action encodes the process once, then runs identically every time.
Peripherals That Enhance Quick Action Workflows
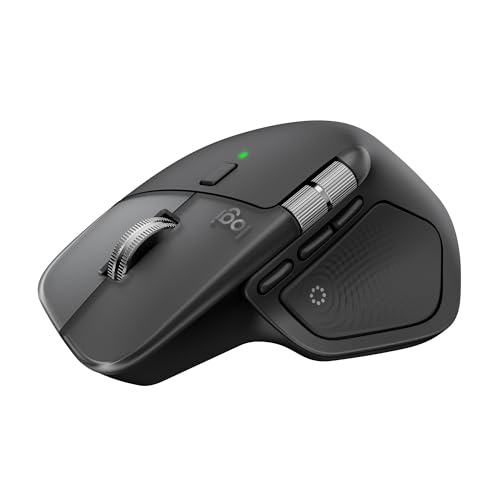
Programmable peripherals accelerate Quick Action usage beyond keyboard shortcuts. The Logitech MX Master 4 for Mac includes gesture buttons and a thumb scroll wheel that can trigger specific actions or shortcuts. The MX Master 4's Actions Ring places frequently used shortcuts directly at your cursor through a customizable overlay, letting you access Quick Actions without moving to the keyboard. The haptic feedback panel provides tactile confirmation when actions trigger, keeping you aware of execution without watching the screen. Here's where to get the Logitech MX Master 4 for Mac (Amazon Affiliate Link): https://www.amazon.com/dp/B0FC5X4F8G?tag=nextlevelmac-20
Pairing a mouse with a keyboard that supports macro programming extends your options further. The Logitech MX Keys S for Mac allows Smart Actions through Logi Options+, letting you assign multi-step sequences to single key presses. Configure a dedicated key to select files, open the Quick Actions menu, and trigger your custom action in sequence. The backlit keys illuminate as your hands approach, making late-night productivity sessions easier on your eyes. This is where to buy the Logitech MX Keys S for Mac (Amazon Affiliate Link): https://www.amazon.com/dp/B0BXX499PC?tag=nextlevelmac-20
Troubleshooting Quick Actions
Quick Actions may not appear for several reasons. Verify the Preview pane is enabled in Finder (View > Show Preview). Check that your file selection matches the action's configured input type. Custom Quick Actions require enabling in System Settings > Privacy & Security > Extensions > Finder.
If a custom Quick Action fails silently, open Automator and run the workflow manually with test files to identify which step produces errors. Console (in Applications > Utilities) logs Automator errors that help diagnose problems with specific actions.
Actions that worked previously may stop appearing after macOS updates. Re-save the Automator workflow to refresh its registration with the system. In rare cases, deleting the workflow from ~/Library/Services/ and creating it fresh resolves persistent issues.
Quick-Action Checklist
Use these steps to start using Quick Actions immediately:
- Open a Finder window and press Command-Option-P to toggle the Preview pane
- Select an image file and click Rotate in the Preview pane to test built-in actions
- Right-click any file and explore the Quick Actions submenu
- Open Automator and create a new Quick Action workflow
- Set the workflow to receive your target file type in Finder
- Add actions from the library and save with a clear name
- Test your custom action by right-clicking appropriate files in Finder
- Assign a keyboard shortcut in System Settings > Keyboard > Keyboard Shortcuts > Services
- For additional Quick Actions related to file management, consider exploring our guide to Finder Smart Folders in macOS Tahoe that automatically organize files based on your criteria: https://www.nextlevelmac.net/finder-smart-folders-in-macos-tahoe-create-automatic-file-organization/

Related Posts
Finder Smart Folders in macOS Tahoe Create Automatic File Organization
Jan 11, 2026
Apple Calendar in macOS Tahoe: Workflow Tips That Save Hours
Jan 11, 2026
Pro Guide to Apple Reminders on Mac in macOS Tahoe
Jan 11, 2026