
Apple builds powerful text customization features directly into macOS Tahoe to help users with dyslexia read more comfortably. From installing specialized fonts to using Accessibility Reader and VoiceOver, your Mac includes tools that reduce reading strain without requiring expensive third-party software.
Key Takeaways
- Install the free OpenDyslexic font on your Mac to make text more distinguishable
- Enable Accessibility Reader in System Settings to create distraction-free reading environments
- Use VoiceOver text-to-speech to hear text read aloud while following along visually
- Customize display settings like text spacing and zoom to reduce visual stress
- Combine physical reading guides with Mac accessibility features for maximum effectiveness
- macOS Tahoe's universal accessibility tools work across all apps without switching modes
At-A-Glance: Mac Dyslexia Tools Comparison
| Feature | Ease of Use | Primary Benefit | Best For |
|---|---|---|---|
| OpenDyslexic Font | Easy (one-time install) | Weighted letters reduce confusion | Document creation, reading |
| Accessibility Reader | Medium (per-app setup) | Removes visual clutter | Web browsing, article reading |
| VoiceOver | Easy (keyboard shortcut) | Hear text while reading | Proofreading, comprehension |
| Display Zoom | Easy (Settings toggle) | Enlarges text system-wide | Users with visual processing issues |
What Makes Reading Difficult With Dyslexia
Dyslexia affects roughly 15 to 20 percent of people worldwide, making it one of the most common learning differences. The brain processes written language differently, which creates specific challenges: letters appear to mirror or flip, words seem to move or blur on the page, and tracking lines of text becomes exhausting.
Standard fonts compound these issues. Characters like b, d, p, and q look nearly identical when flipped. Uniform letter weights provide few visual anchors. Tight line spacing causes text to swim together. Generic black-on-white displays can create glare that strains eyes further.
macOS Tahoe addresses these challenges through multiple accessibility layers that work independently or together. Install a dyslexia-friendly font. Enable Accessibility Reader to simplify page layouts. Activate VoiceOver to hear text spoken while you follow along. Adjust display settings to reduce visual stress. Each tool targets a different aspect of the reading experience.
Installing OpenDyslexic Font on Mac
OpenDyslexic is a free, open-source typeface designed specifically for dyslexic readers. The font adds extra weight to the bottom of each letter, creating a "gravity" effect that anchors characters and prevents them from appearing to flip. Unique character shapes reduce confusion between similar letters.
Download OpenDyslexic from opendyslexic.org. The site offers the font under an open license with no cost. Click the download button to receive a ZIP file containing multiple font files in OTF format.
Unzip the downloaded file to access the individual font files. Double-click any OTF file to open Font Book, macOS's built-in font manager. A preview window appears showing the font's appearance. Click Install Font in the lower-right corner of the preview window. Font Book copies the font to your Mac's Fonts folder and makes it available system-wide.
Repeat this process for each font variant you want to install: OpenDyslexic Regular, Bold, Italic, and Bold-Italic. Installing all variants ensures the font works properly when you apply formatting in documents.
OpenDyslexic now appears in the font menus of all Mac apps that support custom fonts: Pages, Word, TextEdit, Mail, Safari, and more. Select text, open the font menu, and choose OpenDyslexic from the list. The font applies immediately.
For documents you create regularly, set OpenDyslexic as the default font in your word processor's preferences. In Pages, open a new document, format the text with OpenDyslexic, then save the document as a template. In Microsoft Word, select OpenDyslexic in a document, click the Format menu, choose Font, and click Set As Default.
System fonts cannot be changed to OpenDyslexic in macOS Tahoe. Menu text, system dialog boxes, and other interface elements continue using Apple's San Francisco font. OpenDyslexic works in user-created and user-editable content only.
Affiliate disclosure: some links in this article are Amazon Associate links. If you buy through them, Next Level Mac may earn a small commission at no extra cost to you, and we only recommend products that genuinely bring value to your Mac setup.
Using Physical Reading Guides With Your Mac
Colored reading overlays provide an analog complement to digital accessibility tools. These transparent strips reduce visual stress by filtering light from the display and creating a focused reading area that tracks individual lines of text.
Reading guides work particularly well when combined with Mac accessibility features. Place a colored overlay on your Mac's display while Accessibility Reader removes page clutter and VoiceOver reads text aloud. The overlay reduces glare from the backlit display while the software handles text processing.
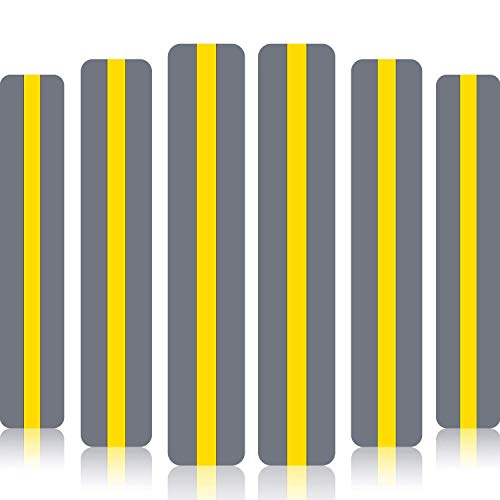
Here's where to get the 18 Pack Reading Guide Strips Colored Overlay https://www.amazon.com/dp/B0828K3W6V?tag=nextlevelmac-20
The strips come in multiple colors because different users respond to different wavelengths of light. Yellow and blue overlays are common starting points, but some readers find green, pink, or amber more effective. Test multiple colors to identify which reduces your specific visual stress.
Place the guide strip on your Mac's display so the transparent section aligns with the line of text you're reading. The gray or opaque portion blocks surrounding text to prevent your eyes from jumping ahead or losing your place. Move the strip down line by line as you progress through the document.
Clean the strips regularly with a microfiber cloth to remove fingerprints and dust. The transparent PVC material is durable and water-resistant but can scratch if cleaned with abrasive materials.
Enabling Accessibility Reader in macOS Tahoe
Accessibility Reader removes visual clutter from web pages and documents to create a focused reading environment. The feature strips away ads, sidebars, navigation menus, and decorative elements, leaving only the main text and relevant images.
Open System Settings and navigate to the Accessibility panel. Select Spoken Content from the sidebar. Scroll down to find Accessibility Reader and toggle it on. macOS adds Accessibility Reader to the View menu in Safari and other compatible apps.
In Safari, open any article or long-form content. Click the View menu and select Show Reader or press Command-Shift-R. The page transforms into a clean, distraction-free view with larger text and improved spacing. The gray background reduces glare compared to bright white pages.
Customize Reader View by clicking the AA icon in the Safari toolbar while Reader is active. Adjust text size, font choice, and background color to match your preferences. OpenDyslexic appears in the font menu if installed, allowing you to combine Reader View with dyslexia-optimized typography.
Accessibility Reader works in Mail, Notes, and some third-party reading apps that support the feature. The toolbar icon appears when Reader View is available for the current content. Not all web pages support Reader View - pages with primarily video content, image galleries, or highly interactive elements may not have a Reader option.
Use Reader View for articles, blog posts, documentation, and other text-heavy content. The simplified layout reduces cognitive load by eliminating movement, flashing ads, and competing visual elements that make tracking text difficult.
Activating VoiceOver for Text-to-Speech Reading
VoiceOver provides system-wide text-to-speech that reads content aloud while highlighting it on screen. This multi-sensory approach helps dyslexic readers by reinforcing visual information with auditory feedback.
Enable VoiceOver by pressing Command-F5 on Macs with Touch ID or by going to System Settings, selecting Accessibility, clicking VoiceOver in the sidebar, and toggling Use VoiceOver on. A voice announces that VoiceOver is active and provides initial instructions.
VoiceOver adds a dark border around screen elements as you navigate. Press Control-Option-Right Arrow to move the VoiceOver cursor to the next item. Press Control-Option-Left Arrow to move to the previous item. VoiceOver reads each item as you navigate to it.
For continuous reading, press Control-Option-A to read from the current position forward. VoiceOver speaks all text on screen from your current location until it reaches the end of the content or you press Control to stop.
Adjust VoiceOver's speaking rate in System Settings under Accessibility > VoiceOver > Speech. Drag the Speaking Rate slider right to increase speed or left to slow down. A faster rate works well for reviewing familiar content, while slower speeds help with complex material.
Change VoiceOver's voice by clicking Voice Options in the Speech panel. macOS Tahoe includes dozens of natural-sounding voices in multiple languages and dialects. Premium voices like Samantha and Tom sound more human than basic system voices.
Use VoiceOver selectively rather than keeping it active constantly. Press Command-F5 to toggle VoiceOver on when you need text read aloud, then press the shortcut again to turn it off when switching to other tasks. This prevents VoiceOver from interfering with activities that don't require spoken feedback.
Customizing Display Settings for Reduced Visual Stress
macOS Tahoe includes display customization options that reduce reading strain without requiring specialized software or fonts. These system-level changes affect all apps and content on your Mac.
Open System Settings and click Displays. Enable Increase Contrast to make text edges sharper against backgrounds. This setting reduces the light gray text that appears in some interface elements and replaces it with darker, higher-contrast alternatives.
Return to System Settings and select Accessibility. Click Display in the sidebar. Enable Reduce Motion to minimize animated effects that can make text appear to move. This setting disables parallax effects on the desktop, reduces animation when opening apps, and stops automatic content playback that creates visual distraction.
Toggle on Reduce Transparency to make window backgrounds fully opaque. macOS Tahoe uses transparent and blurred elements extensively in its interface, which can make reading text over busy backgrounds difficult. This setting adds solid colors behind all interface elements.
Adjust the Pointer Size slider if you lose track of the cursor while reading. A larger pointer remains visible against text without obscuring content the way a larger text cursor would.
Enable Zoom in the Accessibility > Zoom panel to magnify portions of the screen. Press Command-Option-Equal to zoom in. Press Command-Option-Minus to zoom out. Press Command-Option-8 to toggle zoom on and off. Zoom follows your cursor or remains stationary depending on your settings in the Zoom panel.
Use Zoom to temporarily enlarge small text in PDFs, web forms, or interface elements that don't respect your font size preferences. This complements Accessibility Reader's text enlargement for content that doesn't support Reader View.
Setting Up Comfortable Extended Reading Sessions
Long reading sessions on a Mac require ergonomic setup beyond software accessibility features. An ergonomic keyboard reduces physical strain during document creation and editing tasks that accompany reading for work or study.
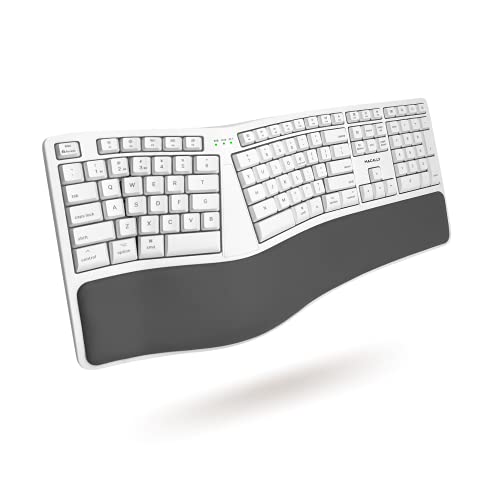
Here's where you can buy the Macally Wireless Ergonomic Keyboard for Mac https://www.amazon.com/dp/B08S3TWPJD?tag=nextlevelmac-20
This split keyboard divides the key layout into two angled sections that position your hands naturally. The design reduces the awkward wrist angle required by standard keyboards. An integrated wrist rest cushions your wrists during extended typing sessions.
The keyboard connects via Bluetooth and pairs with up to three devices simultaneously. Switch between your Mac, iPad, and iPhone by pressing Function plus number keys 1, 2, or 3. The rechargeable battery lasts weeks between charges.
Position your Mac's display at eye level to prevent neck strain. If using a MacBook, place it on a stand and add an external keyboard rather than hunching over the built-in screen. Place the display an arm's length away to reduce eye focusing effort.
Use the 20-20-20 rule during reading sessions. Every 20 minutes, look at something 20 feet away for 20 seconds. This exercise relaxes eye muscles that become fatigued from sustained close-focus work.
Adjust your workspace lighting to eliminate glare on your Mac's display. Position the screen perpendicular to windows rather than directly facing or backing them. Use indirect lighting that illuminates your workspace without creating bright reflections on the screen.
Accessibility and Clarity
macOS Tahoe's accessibility features for dyslexia primarily benefit users with reading-based learning differences, but several elements help broader groups. VoiceOver originated as a screen reader for blind users and gained dyslexia-specific features over time. The high-contrast display modes assist users with low vision. Accessibility Reader helps anyone experiencing cognitive overload or attention difficulties.
The system includes thoughtful considerations for users with motor control challenges. Keyboard shortcuts for VoiceOver and Zoom eliminate the need for precise mouse movements. Voice Control - a separate accessibility feature - allows users who cannot type to dictate text in any app that supports OpenDyslexic or other fonts.
Touch ID integration means users can avoid repeatedly typing complex passwords that might be particularly difficult for dyslexic users to enter accurately. Once authenticated, the Mac remembers app passwords through Keychain, reducing the cognitive load of managing credentials.
macOS Tahoe's predictive text and auto-correction features in Mail and Messages help catch transposed letters and common spelling patterns associated with dyslexia. The system learns your writing patterns over time and offers suggestions based on your personal vocabulary rather than relying solely on dictionary definitions.
One accessibility gap remains: OpenDyslexic cannot be set as a system-wide font. Users must manually select the font in each app, which creates friction when switching between tasks. Safari's Reader View font preference partially solves this for web content, but a true system-wide font option would improve consistency across the Mac experience.
The Accessibility Reader feature works inconsistently across apps. Safari supports it fully. Mail offers limited implementation. Third-party apps vary widely in their compatibility. This fragmentation means users must remember which apps support Reader View and develop different workflows for different contexts.
Despite these limitations, combining OpenDyslexic font installation with macOS Tahoe's native VoiceOver, Accessibility Reader, and display customization tools creates a functional dyslexia accommodation system without requiring expensive specialized software.

Related Posts
VoiceOver Keyboard Shortcuts Transform Mac Accessibility
Jan 15, 2026
Use AirPods Pro 3 as Hearing Aids on Your Mac in macOS Tahoe
Jan 14, 2026
Magnifier for Mac in macOS Tahoe: Your Built-In Visual Aid
Jan 14, 2026