The right USB-C hub makes your Mac setup flow naturally while the wrong one creates a mess of dongles and frustration.
Mac USB-C hubs come in three distinct categories, each designed for specific workflows. Travel hubs stay compact and cover basics like display output and legacy USB devices. Desk hubs max out connectivity with Ethernet, multiple displays, and power delivery. Mac mini hubs combine elevation with port access since the mini's ports sit underneath.
Picking the right category matters more than counting ports. A seven-port travel hub works better for mobile use than a twelve-port desk dock, even though the desk dock offers more connections. The hub that matches how you work delivers better results than the hub with the most features.
Understanding Your Mac's USB-C Ports
Every USB-C port on a Mac handles data, video, and power, but not all ports perform equally. MacBook Pro models with multiple USB-C ports typically designate specific ports for full Thunderbolt speeds. Plugging a hub into a non-Thunderbolt port cuts maximum data transfer and display capabilities.
Check your Mac's specifications to identify which ports support Thunderbolt. The left side ports on 14-inch and 16-inch MacBook Pro models support full Thunderbolt bandwidth. Mac mini M4 provides five Thunderbolt ports on the rear, giving more flexibility for hub placement.
Power delivery through USB-C hubs works differently across Mac models. Hubs pass through charging power from your wall adapter, but many reduce available wattage slightly. An 87W hub connected to a 96W charger typically provides around 85W to your Mac. This reduction rarely causes issues for MacBook Air, but MacBook Pro users running intensive tasks might notice slower charging.
Travel Hubs: Compact Solutions for Mobile Work
Travel hubs prioritize portability and essential connections. These compact adapters plug directly into your MacBook's USB-C port and typically measure under four inches. The best travel hubs avoid blocking adjacent ports and include HDMI, USB-A, and SD card slots.


Affiliate disclosure: some links in this article are Amazon Associate links. If you buy through them, Next Level Mac may earn a small commission at no extra cost to you, and we only recommend products that genuinely bring value to your Mac setup.
The Anker 547 USB-C Hub brings seven ports in a design that sits flush against your MacBook. It expands two USB-C ports into one multi-function USB-C port, one USB-C data port, two USB-A ports, one HDMI port, and SD plus microSD card slots. The multi-function port handles 100W power delivery, 40 Gbps data transfer, and 5K display output simultaneously. Its HDMI port supports 4K at 60Hz, providing smooth video for presentations and external displays.
Here's where to get the Anker 547 USB-C Hub https://www.amazon.com/dp/B0BNZ5V1TF?tag=nextlevelmac-20
The design specifically accommodates MacBook layouts. It attaches without obstructing the MagSafe port on newer MacBook Pro and MacBook Air models. This matters when you need both hub connectivity and MagSafe charging during travel. Most generic hubs force you to choose between the two.
When buying a travel hub, verify HDMI specifications. Many budget options advertise 4K support but limit refresh rates to 30Hz. This creates visible lag during presentations and makes mouse movement feel sluggish on external displays. Hubs supporting 4K at 60Hz cost slightly more but eliminate these frustrations.
SD card slots on travel hubs typically support UHS-I speeds, transferring photos and videos around 100 MB/s. Professional photographers working with larger RAW files might find this limiting. For most users shooting with iPhones or standard cameras, UHS-I proves sufficient for backing up photos during trips.
Desk Hubs: Maximum Connectivity for Stationary Setups
Desk hubs sacrifice portability for comprehensive connectivity. These hubs include Ethernet, additional display outputs, audio jacks, and more USB ports. The trade-off for size brings connections that travel hubs can't accommodate.
The Satechi Aluminum Type-C Pro Hub Adapter offers seven ports optimized for desk use. It provides USB-C charging up to 87W, 4K HDMI at 60Hz, a high-speed USB-C data port reaching 40 Gbps, dual USB 3.0 ports at 5 Gbps, and both micro and SD card readers supporting UHS-I. The brushed aluminum finish matches MacBook aesthetics while the direct-attach design keeps cables minimal.
Where you can purchase the Satechi Aluminum Type-C Pro Hub Adapter https://www.amazon.com/dp/B06XRVX3XM?tag=nextlevelmac-20
This hub plugs directly into your MacBook's USB-C port, transforming it into a mini docking station. The pass-through USB-C port maintains your Mac's charging while simultaneously handling data transfer and video output. You connect your power adapter to the hub rather than directly to your Mac, streamlining cable management on your desk.
Display connectivity separates basic hubs from desk-focused options. Quality desk hubs support dual monitor setups through HDMI and the USB-C port. Remember that M1 and M2 MacBooks only support one external display natively. M3 and newer MacBooks support multiple displays, making dual-output hubs more useful for these models.
Gigabit Ethernet proves essential for desk setups handling large file transfers or video calls. Wi-Fi works fine for general use but wired connections eliminate interference and provide consistent speeds. Hubs with Ethernet ports typically position them prominently since the connector requires more physical space than USB ports.
Some desk hubs include audio jacks, providing a connection point for wired headphones when your MacBook's audio output isn't accessible. This feature matters more for clamshell mode users who keep their MacBook closed while working with external displays. The audio jack gives access to headphone connectivity without opening the lid.
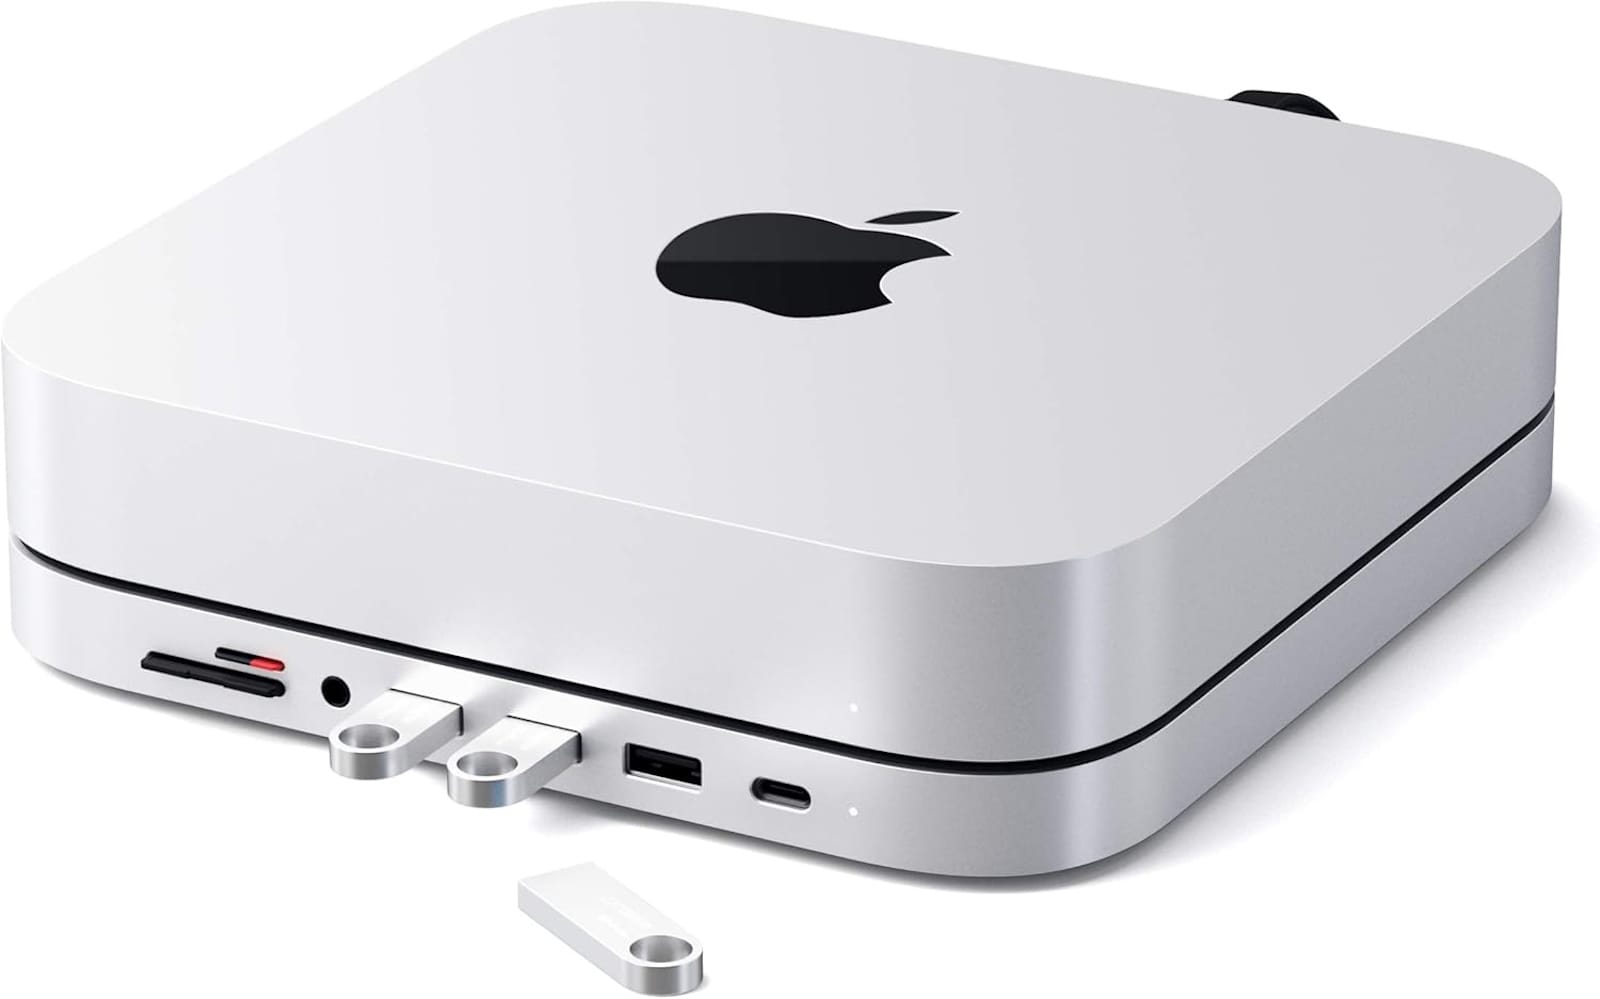
Mac mini Hubs: Elevation and Access Combined
Mac mini presents unique challenges for hub placement. All ports sit on the bottom rear of the device, making frequent cable swapping awkward. Stand-integrated hubs solve this by elevating the mini while providing front-facing ports.
The Satechi Type-C Aluminum Stand & Hub combines both functions. It lifts your Mac mini M1 or M2 off the desk surface while adding a USB-C data port, micro and SD card readers, three USB 3.0 ports, and a headphone jack. The stand connects through a single USB-C cable running from the mini's rear port, keeping the setup clean.
This is where you can get the Satechi Type-C Aluminum Stand & Hub https://www.amazon.com/dp/B08S47KBMC?tag=nextlevelmac-20
Elevation improves both aesthetics and functionality. The raised position allows airflow underneath the mini, helping with heat dissipation during intensive tasks. Front-facing ports make connecting USB drives and SD cards significantly easier compared to reaching behind the mini for rear ports.
The single-cable connection limitation means you'll still use the mini's built-in ports for displays, Ethernet, and power. The hub handles frequently accessed connections like USB devices and card readers, reducing the need to access rear ports daily. This division works well for typical mini workflows.
Note that this particular stand only supports Mac mini M1 and M2 models. The M4 Mac mini features a different footprint and port layout, requiring different mounting solutions. Check compatibility before purchasing any Mac mini stand or hub.
Avoiding Common Hub Mistakes
Hub specifications often confuse buyers with technical terms. USB 3.0 and USB 3.1 Gen 1 describe identical 5 Gbps transfer speeds. Manufacturers sometimes list both to make specs appear more impressive. USB 3.1 Gen 2 offers 10 Gbps speeds, representing a genuine upgrade.
Power delivery ratings need context. A hub advertising 100W PD might only provide 85W to your Mac after accounting for the hub's own power consumption. This matters for 16-inch MacBook Pro users with 140W power adapters. The hub becomes a bottleneck, slowing charge times during intensive work.
Port placement affects usability more than most people expect. Hubs with ports on both sides create cable clutter, with cords running in multiple directions. Single-side port layouts keep cables organized but might feel cramped when multiple devices connect simultaneously. Consider where cables will route before committing to a hub design.
Display output specifications deserve close attention. Some hubs advertise 4K support without specifying that they only reach 4K at 30Hz through HDMI while hitting 4K at 60Hz through the USB-C port. Reading the fine print reveals these limitations before they cause disappointment.
Hub compatibility with Mac cases rarely gets mentioned in marketing materials. Many hubs designed for MacBook sit flush against the ports, requiring case removal for connection. This becomes tedious if you frequently attach and detach the hub. Check product reviews for case compatibility warnings.
Setting Up Your Hub
macOS Tahoe includes enhanced security for USB-C accessories. When connecting a new hub for the first time, your Mac prompts you to allow the accessory. This security feature prevents unauthorized devices from accessing your data. Unlock your Mac and approve the hub when the dialog appears.
The approval only happens once per hub. After initial authorization, the hub connects automatically whenever you plug it in. If your Mac has been locked for three or more days, you might need to reapprove previously authorized accessories. This rarely occurs in practice unless you travel extensively.
Some hubs require firmware updates for optimal performance. Check the manufacturer's website after purchasing a new hub. These updates typically improve stability and compatibility with newer macOS versions. The update process varies by manufacturer but generally involves downloading an app that handles the firmware installation.
Port priority matters when multiple devices connect through a single hub. Bandwidth-intensive devices like external SSDs should connect to USB 3.0 or USB-C ports capable of 5 Gbps or faster. Peripherals like keyboards and mice work fine on slower USB 2.0 ports. This allocation prevents data bottlenecks during file transfers.
Testing Your Hub Setup
Connect your hub and verify all ports function correctly. Plug a USB drive into each port and confirm the drive mounts on your desktop. Some hubs have manufacturing defects affecting specific ports while others work perfectly. Testing immediately after purchase ensures you can return a defective unit within the return window.
Display output deserves separate testing. Connect an external monitor through the hub's HDMI port and verify it reaches the advertised resolution and refresh rate. Check System Settings > Displays to confirm the display settings match specifications. Some hubs claim 4K at 60Hz but default to 30Hz, requiring manual adjustment in display settings.
Power delivery testing matters for MacBook Pro users. Start with your Mac at around 50 percent battery, connect the hub with your power adapter, and monitor charging speed. The Mac should charge at normal rates while using the hub. Significantly slower charging might indicate the hub can't handle your power adapter's full wattage.
Card reader performance varies significantly between hubs. Insert an SD card and transfer a large file to your Mac. Monitor the transfer speed in Finder. Quality hubs maintain UHS-I speeds around 100 MB/s. Hubs with slower speeds might use cheaper components that bottleneck card reader performance.
When Hubs Fall Short
Some workflows exceed what single hubs can provide. Video editors working with multiple external SSDs and monitors might need a full Thunderbolt dock rather than a basic hub. Thunderbolt docks cost significantly more but provide bandwidth and power that standard USB-C hubs can't match.
Network engineers and IT professionals often require multiple Ethernet connections. Standard hubs provide one Ethernet port at most. These users benefit from dedicated network adapters or professional docking stations with multiple Ethernet interfaces.
Musicians using USB audio interfaces sometimes experience ground loop interference with certain hubs. The hub's power delivery system can introduce noise into the audio signal. If your recordings contain unexpected buzzing or humming, try connecting your audio interface directly to the Mac rather than through the hub.
The number of bus-powered devices you can connect through a hub has limits. Each USB port provides around 4.5 to 7.5 watts of power for connected devices. Connecting multiple power-hungry devices like external hard drives can exceed these limits, causing devices to disconnect intermittently. Consider self-powered USB hubs for setups with many bus-powered peripherals.
Building Around Your Hub
Once you've selected a hub matching your workflow, organize cables to prevent desk clutter. Velcro cable ties keep hub cables bundled together, making the setup look intentional rather than chaotic. Under-desk cable trays hide excess cable length while keeping everything accessible.
Label cables if your hub connects many devices. Small cable labels or colored tape help identify which cable connects to which device. This saves time when troubleshooting connection issues or reorganizing your workspace.
Consider your hub placement carefully. Placing the hub too far from where you sit forces you to reach awkwardly when connecting USB drives. Too close and cables create visual clutter in your work area. Most people find the optimal spot about twelve to eighteen inches from where their hands naturally rest while typing.
Regular hub maintenance extends longevity. Dust accumulation in ports causes intermittent connections. A quick burst of compressed air every few months keeps ports clean. Avoid blowing directly into ports with your mouth, as moisture from breath can corrode internal components over time.
USB-C hubs transform how you use your Mac by matching connectivity to workflow. Travel hubs keep your setup mobile without sacrificing essential ports. Desk hubs maximize connections for stationary workspaces. Mac mini solutions combine elevation with access. The hub that works best fits how you actually work, not the one with the most features listed on the box.

Related Posts
Lift Your Mac Display: Monitor Arms for Better Ergonomics and Cleaner Desks
Jan 09, 2026
Mac Audio Interfaces: Transform Your Recording Setup
Jan 06, 2026
erfect Your Mac Video Calls with Professional Lighting
Jan 04, 2026