Marking up files on Mac doesn't require separate apps or subscriptions. macOS Tahoe embeds annotation tools throughout the system, making it possible to highlight PDFs, sign documents, sketch on screenshots, and add text to images without switching between programs.
These built-in tools appear in Quick Look previews, Preview app, Mail attachments, Messages conversations, and screenshots. Once you learn where they live and how they work together, you can annotate files faster than opening third-party software.
Quick Look markup saves time
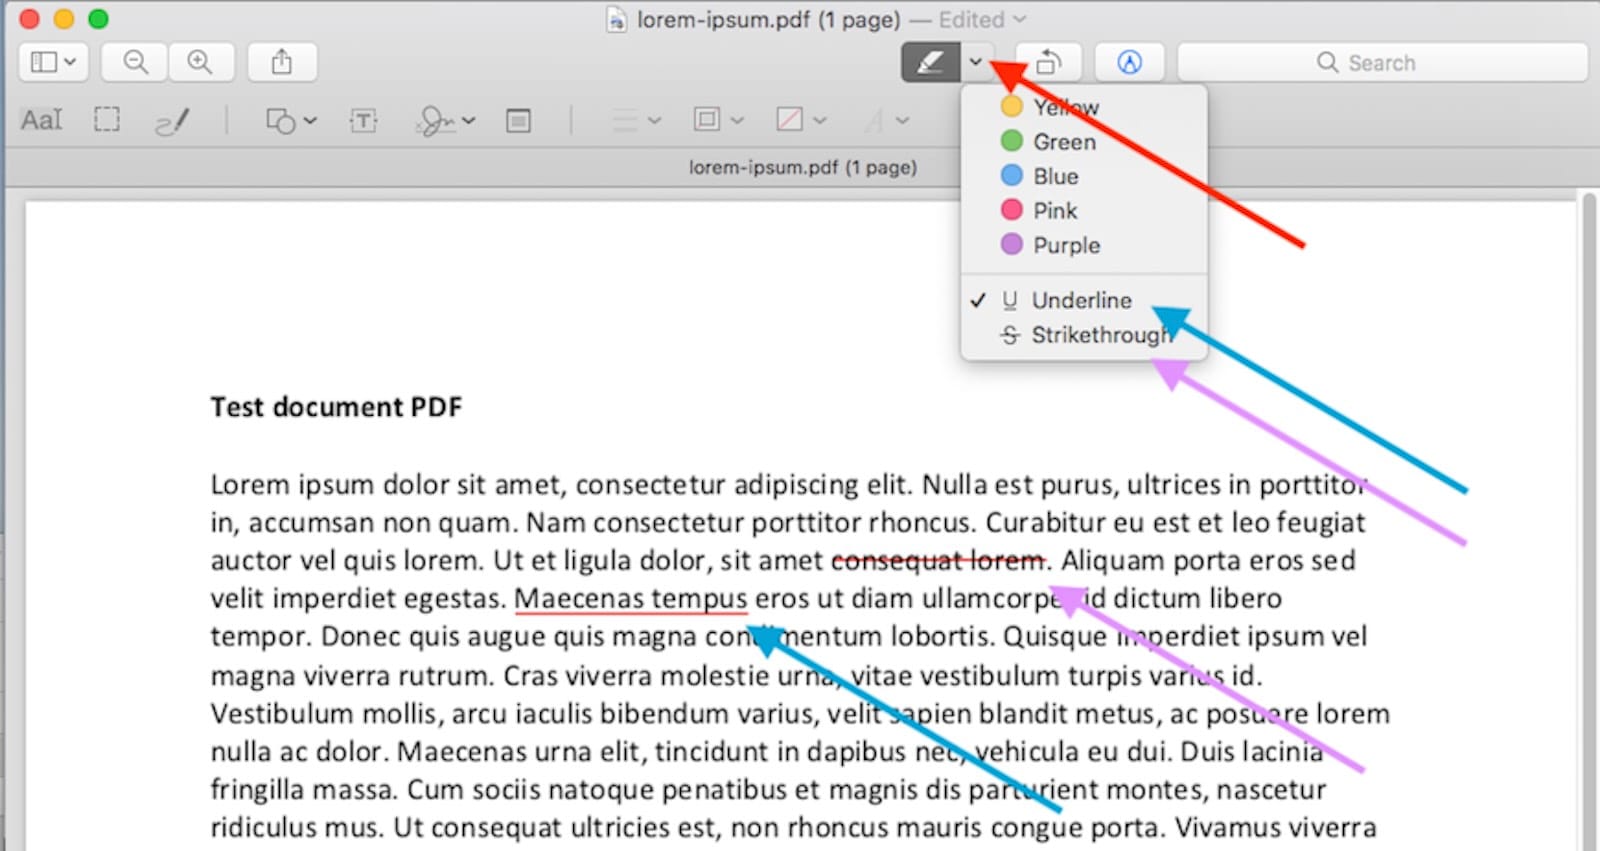
Quick Look turns any file into an annotation canvas. Select a file in Finder, press Space, and the preview window appears. The markup toolbar button sits in the top right corner.
Click it, and annotation tools appear without opening the file. Add text boxes, draw shapes, insert signatures, highlight passages, or sketch freehand. Changes save automatically when you close the window.
This works on PDFs, images, and screenshots. When someone emails a contract that needs one signature, Quick Look handles it in seconds. When you need to circle an error in a screenshot before sharing it, Quick Look does that too.


Affiliate disclosure: some links in this article are Amazon Associate links. If you buy through them, Next Level Mac may earn a small commission at no extra cost to you, and we only recommend products that genuinely bring value to your Mac setup.
The system remembers your last-used tool, color, and line thickness. If you annotated the previous file with a red arrow, the next Quick Look session starts with red arrows ready.
Quick Look markup works on external displays through Sidecar. When your iPad becomes a second screen, Quick Look windows can move to iPad where annotation feels more natural. The Mac displays the markup toolbar while your hand works on iPad's touchscreen.
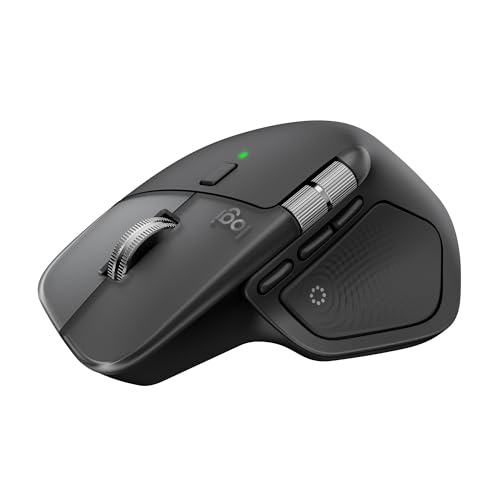
For precise cursor work during annotations, a responsive mouse changes everything. https://www.amazon.com/dp/B0FC5X4F8G?tag=nextlevelmac-20
The 8K DPI sensor tracks accurately on any surface, including glass desktops. Haptic feedback confirms every click and scroll action. The MagSpeed scroll wheel lets you navigate multi-page PDFs without breaking focus. Customizable Actions Ring provides instant access to markup tools across Preview and Quick Look.
Preview handles complex annotations
Preview extends what Quick Look starts. Open any PDF in Preview, and the full markup toolbar appears in the top toolbar. It includes tools Quick Look doesn't show: adjustable line weights, shape opacity controls, text box formatting, and annotation layers.
The Annotate menu reveals additional tools. Add speech bubbles, insert magnified callouts, or place signature stamps. The signature feature captures your written signature through your Mac's camera, storing it for future use across any document.
Preview supports multi-page markup workflows. Thumbnail sidebar shows every page in a PDF. Jump between pages, add different annotations to each, and Preview tracks all changes. The tool palette stays consistent across pages, so marking up a 50-page document doesn't require resetting tools.
Preview's text tool creates editable text boxes anywhere on a PDF or image. Adjust font, size, color, and alignment after placement. This beats trying to remember settings before clicking.
Shape tools snap to clean angles. Hold Shift while drawing rectangles or circles, and they lock to perfect squares and circles. Arrows automatically add arrowheads. Lines connect objects with single clicks.
For serious markup work requiring pen-on-paper precision, drawing displays transform Mac annotation workflows. https://www.amazon.com/dp/B09H738G1D?tag=nextlevelmac-20
The X3 stylus delivers 16K pressure levels and minimal activation force. The full-laminated screen eliminates parallax between pen tip and cursor. 127% sRGB color accuracy ensures annotations appear correctly. The portable 11.9-inch form factor fits laptop bags while providing detailed work space.
Screenshots include instant markup
Taking screenshots in macOS Tahoe automatically offers markup tools. Press Command-Shift-5 to open Screenshot utility. After capturing any screenshot, a thumbnail appears in the bottom right corner.
Click the thumbnail before it fades, and the screenshot opens in markup mode. Add arrows, text, shapes, or sketches immediately. This happens without saving the screenshot first or opening Preview.
The markup tools match Preview's full set. Text boxes accept typing. Shapes fill with colors. Signature stamps apply saved signatures. When finished, click Done and choose where to save. The system remembers the last save location.
For direct pen input on Mac-connected tablets, dedicated drawing tablets work seamlessly with Mac markup tools. https://www.amazon.com/dp/B079HL9YSF?tag=nextlevelmac-20
This compact tablet includes 4096 pressure levels for precise control. Four customizable ExpressKeys trigger common annotation commands. Bluetooth connectivity keeps desks clean, and Mac driver installation takes minutes. The pen never needs charging, and the 7-inch active area handles detailed markup work without occupying excessive desk space.
System-wide markup through share menus
Markup tools appear in unexpected places through Share menus. Open an image in Safari, click the Share button, and select Markup. The browser displays annotation tools without leaving Safari.
This works in Mail too. Draft an email, attach an image or PDF, and click the down arrow next to the attachment. Choose Markup, and annotation tools appear in Mail's compose window. Mark up the attachment and send it directly without opening other apps.
Messages includes the same capability. When someone sends an image, tap to view it full-screen, then tap the Markup button. Annotate the image and send the marked-up version back in the same thread.
Markup changes don't overwrite originals in most system apps. Mail keeps the clean version and the marked-up version separate until you explicitly save changes. This prevents accidentally destroying original files during quick annotations.
Keyboard shortcuts speed up markup
Mac markup tools respond to keyboard commands. Press Command-Z to undo recent annotations. Command-Shift-Z redoes them. Delete key removes selected objects.
Arrow keys move selected text boxes or shapes by single pixels. Hold Shift with arrow keys, and objects move by larger increments. This precision helps align multiple annotations without mouse dragging.
Command-A selects all markup objects on the current view. Drag the selection to move everything together. Copy and paste work too—duplicate an annotated callout across multiple pages without redrawing it.
Text formatting follows standard shortcuts. Command-B bolds text in text boxes. Command-I italicizes. Command-U underlines. These work while editing any markup text object.
Sharing annotated files
Markup changes embed into PDFs and images as you work. Save the file, and annotations become permanent parts of it. Recipients see your markup when they open the file, regardless of their operating system.
Preview offers export options that flatten markup into images. Choose Export from the File menu, and select image format. The PDF becomes a JPEG or PNG with annotations baked in. This helps when sharing with people who might accidentally delete markup layers.
AirDrop sends marked-up files to nearby Apple devices instantly. Annotate a document in Preview, click Share, and choose AirDrop. The recipient gets the file with all markup intact within seconds.
Cloud services like iCloud Drive, Dropbox, or Google Drive preserve markup in PDFs. Upload an annotated PDF, and collaborators download it with all your notes, highlights, and drawings visible. The markup stays non-destructive in PDFs, letting others edit or remove your annotations if needed.
Advanced markup techniques
Preview's adjustable color palette lets you create custom annotation colors. Click the color well in the toolbar, and the Colors panel opens. Choose any color using the color wheel, or enter specific hex codes for brand color matching.
Opacity sliders control annotation transparency. Highlight text with semi-transparent yellow, or add subtle watermarks using low-opacity text boxes. The slider appears in the Colors panel next to color selection.
Layer order matters when annotations overlap. Right-click any markup object and choose Bring to Front or Send to Back. This controls which annotations appear above others, useful when adding complex multi-layer notes to documents.
Preview's magnifier tool zooms specific document areas without changing the overall view. Draw a magnified callout circle, and Preview creates a zoomed copy of that region floating above the document. This helps point out tiny details in screenshots or technical diagrams.
Markup tool limitations
Mac's built-in markup tools don't include advanced PDF editing like page rearranging, content deletion, or text editing within existing PDF text. Those tasks require Preview's Organize mode or separate PDF editors.
Annotations don't sync across iCloud automatically. Mark up a file on your Mac and open it on iPhone, the markup appears only if you saved the file to iCloud Drive after annotating. The markup itself isn't a separate iCloud-synced layer.
Complex vector illustrations exceed markup tool capabilities. While you can draw freehand and create basic shapes, detailed artwork needs dedicated design software. Markup tools handle communication and notation, not professional illustration.
Collaboration features are minimal. Multiple users can't annotate the same document simultaneously using Mac markup tools. Everyone must take turns editing and saving. Real-time collaborative annotation requires third-party tools or Google Docs-style platforms.


Related Posts
Master Mac Menu Bar Management: Streamline Your Workspace
Jan 08, 2026
Unlock Faster Mac Wi-Fi Speeds with macOS Tahoe 26.2's Hidden 160MHz Upgrade
Jan 06, 2026
Master Mac Screenshot and Screen Recording in macOS Tahoe
Jan 01, 2026