You already have studio-quality screen recording and screenshot tools built into your Mac. Most people reach for third-party apps when macOS Tahoe already delivers what content creators, designers, and professionals need. The Screenshot app hiding in your Mac can capture in HDR, record with precise audio control, and integrate into workflows faster than any paid alternative.
macOS Tahoe brings significant improvements to these native tools, including HDR capture support, better audio handling for screen recordings, and smarter floating thumbnail workflows. Understanding these features transforms how you create tutorials, document workflows, or capture moments for reference.
Opening the Screenshot Toolbar
Press Shift-Command-5 to reveal the Screenshot toolbar. This single keyboard shortcut unlocks every capture option macOS offers. The toolbar floats across your screen with five capture buttons on the left and recording options on the right. You can also find the Screenshot app in the Utilities folder within Applications, but the keyboard shortcut proves faster for daily use.
The toolbar displays five icons for different capture modes. The first three handle screenshots: capture entire screen, capture selected window, and capture selected portion. The final two manage screen recordings: record entire screen and record selected portion. Each mode serves specific scenarios, and switching between them takes one click.
macOS positions controls within easy reach. Options sit in a dropdown menu where you set timer delays, choose save locations, show mouse pointer clicks, and select capture formats. These settings stick between sessions, so configuring them once streamlines future captures.
Keyboard Shortcuts Beyond the Basics
Shift-Command-3 captures your entire screen instantly. The screenshot saves to your desktop or designated folder without opening the toolbar. This speed matters when documenting something that might disappear, like error messages or fleeting interface states.
Shift-Command-4 transforms your cursor into a crosshair for selecting specific screen areas. Click and drag to define the capture region. While dragging, hold Spacebar to reposition the selection without changing its size. Release the mouse to capture. Press Escape before releasing to cancel.
Add Control to any screenshot shortcut to copy the image to your clipboard instead of saving a file. Control-Shift-Command-3 copies the full screen, while Control-Shift-Command-4 copies a selection. Paste directly into Messages, Mail, Notes, or design apps without managing files.
Shift-Command-6 captures the Touch Bar on compatible MacBooks. This specialized shortcut helps document Touch Bar workflows or create training materials showing dynamic button configurations.
Capturing Windows and Menus Precisely
After pressing Shift-Command-4, tap Spacebar to switch from area selection to window capture mode. Your cursor becomes a camera icon. Hover over any window, and macOS highlights it with a blue overlay. Click to capture that window with its drop shadow and rounded corners preserved.
This window capture mode works on menus too. Open a menu, press Shift-Command-4, hit Spacebar, then click the menu. macOS captures the menu exactly as displayed, including transparency effects and shadows. This precision helps when creating interface documentation or filing bug reports that require exact visual reproduction.

Affiliate disclosure: some links in this article are Amazon Associate links. If you buy through them, Next Level Mac may earn a small commission at no extra cost to you, and we only recommend products that genuinely bring value to your Mac setup.
Window captures maintain consistent framing regardless of window size or position. The captured image contains only the window content plus its shadow, with background elements automatically excluded. This automatic cropping saves editing time compared to manual selection and trimming.
Screen Recording with Professional Audio
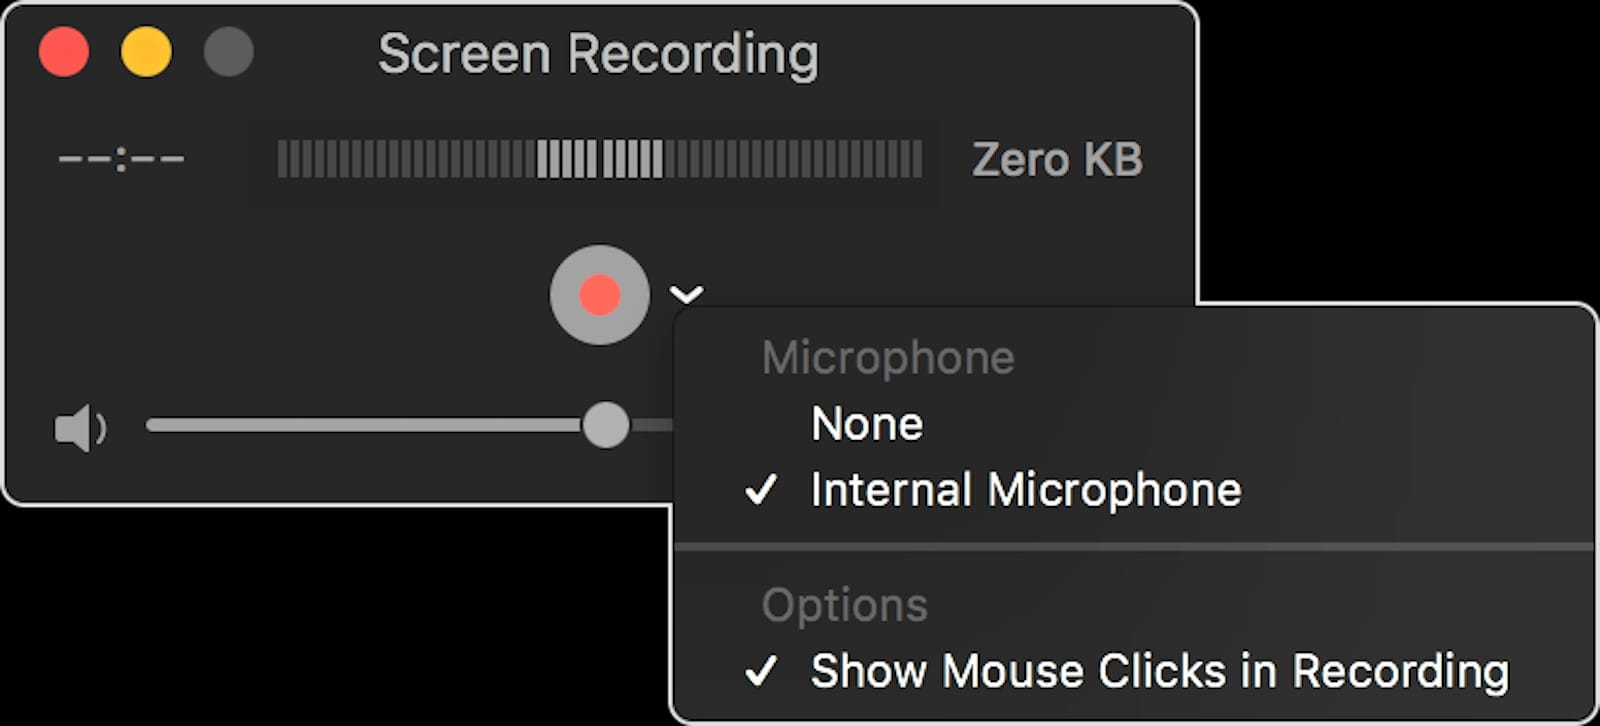
Click the record button in the Screenshot toolbar or press Shift-Command-5 and choose a recording mode. Before starting, click Options to configure audio sources. macOS lets you record system audio, microphone input, or both simultaneously. Recording both creates tutorials where your voice explains actions while viewers hear interface sounds.
The microphone dropdown lists every connected audio input. Choose your Mac's built-in mic for quick captures or select a USB microphone for broadcast-quality narration. Where you can get the Elgato Wave:3 (Amazon Affiliate Link): https://www.amazon.com/dp/B088HHWC47?tag=nextlevelmac-20
Show Mouse Clicks highlights your cursor with a black circle during recordings. This visual feedback helps viewers follow along with complex workflows. The click indicator appears large enough to see clearly at typical video resolutions without overwhelming the content.
Timer delays give you seconds to prepare before recording starts. Set a five or ten-second countdown to hide the Screenshot toolbar, position windows, or prepare your first action. The countdown displays on-screen so you know exactly when recording begins.
HDR Capture on Compatible Macs
macOS Tahoe introduces HDR screenshot and recording options for Macs with HDR-capable displays. Open Screenshot, click Options, and look for the capture format setting. Choose HDR to capture in high dynamic range using HEIF for images or HEVC for video. The SDR option remains available for maximum compatibility with apps and displays that don't support HDR.
HDR captures preserve the full brightness range your display can produce. This accuracy matters when documenting HDR content, color-critical design work, or any visual elements that lose impact when compressed to standard dynamic range. Files stay relatively compact thanks to HEIF and HEVC's efficient compression.
When sharing HDR screenshots with colleagues who don't have HDR displays, they'll see SDR versions automatically. macOS handles the conversion, though some detail gets lost in translation. Recording in SDR from the start ensures consistent appearance across all viewing conditions.
Managing the Floating Thumbnail
After capturing, a thumbnail appears briefly in the bottom-right corner of your screen. This preview window provides quick access to editing and sharing options. Click the thumbnail to open Markup tools for annotations, crops, and adjustments. Swipe right on the thumbnail to immediately save and dismiss it.
Drag the thumbnail directly into Messages, Mail, Notes, or any app that accepts images. This direct manipulation eliminates the save-locate-attach workflow entirely. Drop the thumbnail into an email draft to share instantly, or into a Finder window to save with a custom name.
If you ignore the thumbnail, it disappears after five seconds and saves automatically to your chosen location. The default behavior keeps screenshots out of your way while ensuring nothing gets lost. Some users report bugs in macOS Tahoe where thumbnails don't save correctly when dragged, so disabling Show Floating Thumbnail in Options prevents this issue if you encounter it.
Changing Save Locations and Formats
Screenshots land on your desktop by default, which clutters quickly if you capture frequently. Open Screenshot, click Options, and choose Save To for alternatives. Pick Documents, Downloads, or create a dedicated Screenshots folder. Mail option opens a new email with the screenshot attached. Clipboard copies the image for immediate pasting.
Preview opens your screenshot in Preview app automatically after capture. This proves useful when you need instant access to editing tools or want to inspect details before saving. The Recently Opened section in Preview becomes your screenshot archive.
macOS saves screenshots as PNG files by default - a lossless format that maintains quality. Screen recordings save as MOV files using H.264 compression for compatibility. Filenames include Screenshot or Screen Recording plus the date and time. This automatic naming prevents confusion when you capture multiple images in quick succession.
Recording with Precision and Control
Start recording by clicking the toolbar's record button or selecting your target after pressing Shift-Command-5. A stop recording icon appears in your menu bar. Click it when finished. macOS processes the recording and presents the familiar floating thumbnail for quick editing or sharing.
Record selected portions to focus viewers on specific interface areas. This selective recording reduces file size and eliminates distracting elements from other displays or desktop clutter. Draw a rectangle around the area you want captured, then click Record. The recording boundary stays fixed even if you move windows or switch apps.
Audio settings persist between sessions, so configuring your microphone once streamlines future recordings. If you regularly create tutorials, set your preferred microphone and enable Show Mouse Clicks, then macOS remembers these preferences. Each new recording uses these settings automatically.
Annotation and Quick Edits
Click a screenshot thumbnail to open Markup tools. Add arrows, shapes, text, or signatures directly. The tools palette appears at the bottom with options for drawing, highlighting, magnifying details, or adding shapes. Markup changes appear in real-time, letting you annotate quickly without switching to dedicated image editors.
The crop tool in Markup removes unwanted edges or focuses on specific elements. Drag the corner handles to adjust framing, then click Done. Adjustments save automatically to the original screenshot or create a copy depending on where you opened Markup from.
Text annotations use system fonts and colors. Type directly on the screenshot to add labels, explanations, or callouts. The text tool supports multiple sizes and styles, adequate for most documentation needs without opening professional design software.
Integration with Continuity and iCloud
Screenshots sync across devices when you use iCloud Drive as your save location. Capture something on your Mac and access it immediately on iPad or iPhone through the Files app. This cross-device availability streamlines workflows where you capture on one device but need the image on another.
Universal Clipboard works with screenshot keyboard shortcuts too. Control-Shift-Command-4 copies a selection to your clipboard, which syncs to nearby Apple devices. Paste on your iPhone seconds after capturing on your Mac, provided both devices are signed into the same Apple Account and have Bluetooth enabled.
Handoff lets you start a screen recording on Mac and continue editing on iPad using compatible apps. The reverse works too - capture on iPad then fine-tune with desktop tools. This flexibility adapts to wherever your workflow takes you.
Advanced Workflow Scenarios
Create time-lapse tutorials by combining static screenshots with screen recordings. Capture key steps as individual screenshots for written guides, then record the full process for video versions. Having both formats from the same session ensures consistency across documentation types.
Document software bugs with precision by enabling Show Mouse Clicks and recording the exact steps to reproduce problems. Include system audio to capture error sounds. This complete documentation helps support teams understand and fix issues faster than written descriptions alone.
Build keyboard shortcut reference guides by capturing menus and dialogs that show shortcut keys. macOS captures menu text clearly, making it easy to create quick-reference sheets without manual transcription. String multiple captures together in Preview or Keynote for comprehensive guides.
macOS Tahoe's native screenshot and screen recording tools deliver professional results without subscription fees or learning curves. The keyboard shortcuts become muscle memory within days, and the floating thumbnail workflow keeps you moving without interruption. Third-party apps still serve specific advanced needs, but most users find everything necessary already installed on their Mac.


Related Posts
Unlock Faster Mac Wi-Fi Speeds with macOS Tahoe 26.2's Hidden 160MHz Upgrade
Jan 06, 2026
Master Mac Markup Tools in macOS Tahoe
Jan 03, 2026
Hide Website Distractions in Safari with macOS Tahoe
Dec 31, 2025