
GarageBand sits quietly on your Mac, already installed and ready to transform your ideas into broadcast-quality podcasts. No subscriptions, no complicated installations, no learning curves that feel like climbing mountains. Just open it, and you have access to the same core audio tools that power professional podcast studios around the world.
I'm going to walk you through the complete podcast production workflow in GarageBand, from setting up your first recording to exporting finished episodes. This isn't about theory or abstract concepts. These are the specific steps, settings, and techniques that work when you're sitting at your Mac trying to make a podcast happen.
Understanding GarageBand for Podcast Production
GarageBand gives you multitrack recording, which means you can record your voice on one track, add intro music on another, and drop in sound effects on a third. Everything stays separate and editable. If you mess up a word, you fix just that word. If your music is too loud, you adjust just the music. This flexibility is why podcasters stick with GarageBand even after they know how to use more complex software.
The interface centers around a timeline where your audio appears as colorful blocks called regions. Your microphone records to one track, while imports like music files live on others. The playhead moves left to right as your podcast plays, and you can click anywhere on the timeline to jump to that moment. Controls sit at the top for recording, playback, and editing. It's organized the way you think when making a podcast.
Setting Up Your First Podcast Project
Open GarageBand and choose Voice when it asks what kind of project you want. This loads a template optimized for spoken word with compression and EQ already dialed in for clarity. The default settings work well enough to start recording immediately, though we'll refine them shortly.
Click the red record button and GarageBand captures whatever your Mac hears through its selected input. Before recording your first word, open GarageBand preferences and verify your microphone appears as the input device. If you're using an external microphone, it should show up automatically when connected. The input level meter shows green bars that bounce as you talk. Aim to keep them in the upper third of the meter without hitting red.


Affiliate disclosure: some links in this article are Amazon Associate links. If you buy through them, Next Level Mac may earn a small commission at no extra cost to you, and we only recommend products that genuinely bring value to your Mac setup.
Choosing the Right Microphone
Your Mac's built-in microphone works for testing the workflow, but podcast listeners notice the difference when you upgrade to dedicated gear. Dynamic microphones reject room noise and focus on your voice, making them ideal for home recording environments where you can't control every sound.
The Shure MV7+ represents the sweet spot of podcast microphones for Mac users. It connects via USB-C, matching the ports on modern Macs without adapters or dongles. The sound quality rivals broadcast studios, with a warm, clear tone that makes voices easy to understand. Auto Level Mode handles gain automatically, adjusting as you move closer or farther from the microphone. This removes one variable when you're learning the basics.
Where you can get the Shure MV7+ USB Microphone (Amazon Affiliate Link): https://www.amazon.com/dp/B0CTJ7PVN1?tag=nextlevelmac-20
Connect the MV7+ to your Mac, and GarageBand recognizes it immediately. Select it as your input device in preferences, and you're recording with professional tools. The built-in headphone jack lets you monitor your voice in real-time without latency, which means you hear yourself as you sound rather than with a distracting delay.
Recording Your Podcast in GarageBand
Click the metronome button to turn it off. Podcasts don't need a beat clicking in the background. Make sure monitoring is enabled for your voice track so you can hear yourself through headphones as you record. This closed-loop monitoring prevents you from speaking too quietly or too loudly because you get immediate feedback.
Hit record and speak naturally. Don't restart if you make a mistake. Just pause, take a breath, and say the sentence again correctly. You'll edit out the mistake later. This approach keeps your energy up and your recording sessions shorter. Professional podcasters record this way because fixing small errors during editing takes less time than doing multiple perfect takes.
GarageBand creates a new region on your track for each recording pass. If you stop and start recording multiple times, you'll see separate blocks that you can move, trim, or delete independently. This modular approach makes editing feel less destructive because you're rearranging pieces rather than cutting into a single massive file.
Editing Your Podcast Like a Pro
Press command-T to split a region at the playhead position. This is your most-used editing shortcut. Click where you made a mistake, press command-T to cut before it, move the playhead to after the mistake, press command-T again, then delete the region containing the error. Click and drag to close the gap, and your edited version sounds seamless.
The zoom slider at the top of the window lets you see more detail when making precise edits. Zoom in until you can see the waveform clearly, showing where your voice starts and stops. You want to cut just before you begin speaking and just after you stop, preserving the natural rhythm of your speech.
Compression and EQ are already applied to your voice track through the default podcast template, but you can adjust them if needed. Click the Smart Controls button to see the settings. The compressor reduces the difference between your loud and quiet words, making everything easier to hear. The EQ boosts clarity in your voice frequencies while reducing rumble and harshness. Unless something sounds wrong, leave these settings alone. They work.
Adding Music and Sound Effects
Drag an audio file from Finder directly into GarageBand, and it creates a new track with that audio in place. Intro music goes at the beginning, outro music at the end, and transition music wherever you want breaks. Position your music where it belongs on the timeline, then adjust its volume using the track volume slider. Music should sit behind your voice, not compete with it. A good starting point is about 30 percent lower than your voice level.
GarageBand includes a loop library with thousands of royalty-free music clips and sound effects. Click the loop browser button, search for what you need, and drag loops onto your timeline. These loops are designed to repeat seamlessly, so you can extend them to any length by grabbing the top-right corner of the region and pulling it to the right.
Fade music in and out by adding automation. Click the automation button on a music track to see a yellow line running horizontally through the waveform. Click and drag this line downward to reduce volume at specific points. Create fade-ins by starting the line low and pulling it up gradually. Create fade-outs by pulling it down as the music ends. This technique makes your podcast sound polished rather than abruptly chopped.
Mixing Multiple Voices
When recording interviews or co-hosts, each person needs their own track. This keeps voices separated so you can adjust levels individually. If one person speaks quietly and another loudly, you balance them during mixing rather than during recording.
Record each person's audio on a separate input by assigning different microphones to different tracks. If you're recording remotely, have guests use software like Zoom or Squadcast to capture their audio locally, then send you their files. Import these files as new tracks in GarageBand, and sync them by finding a moment where everyone spoke at once. Line up those waveforms, and the rest of the conversation stays in sync.
Match the tone and volume of different voices using the EQ and compression on each track. If one voice sounds thin, boost the lower midrange around 200-400 Hz. If another sounds muddy, cut some of those same frequencies. The goal is making all voices sound like they belong in the same room, even when they were recorded separately.
Essential Monitoring Gear
Editing podcasts requires accurate headphones that reveal problems rather than making everything sound good artificially. Studio monitors like the Audio-Technica ATH-M50x provide flat frequency response, meaning they reproduce audio without coloring or boosting specific ranges. When you're removing background noise or adjusting EQ, these headphones let you hear what's actually there.
This is where to buy the Audio-Technica ATH-M50x Professional Studio Monitor Headphones (Amazon Affiliate Link): https://www.amazon.com/dp/B00HVLUR86?tag=nextlevelmac-20
The closed-back design isolates you from room noise while you edit, and the comfortable earpads support long sessions without fatigue. They're built for exactly this kind of work, not for casual listening. When you make a change in GarageBand, the ATH-M50x shows you precisely how that change affects your audio.
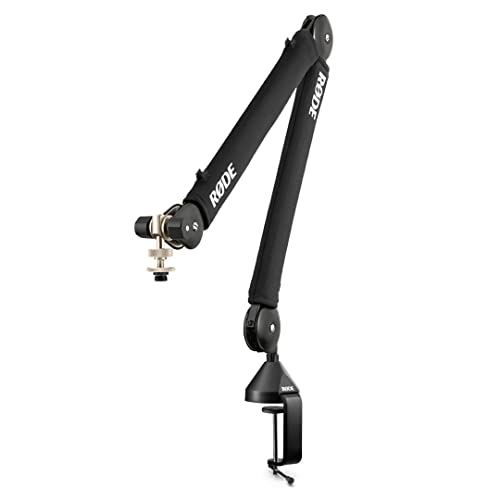
Positioning Your Microphone
Microphone placement matters as much as microphone quality. Aim the microphone at your mouth from about six inches away, slightly off to the side to avoid plosive sounds from P and B consonants. A boom arm holds your microphone in this position without taking up desk space or requiring a bulky stand.
The place to get the RØDE PSA1+ Professional Studio Boom Arm (Amazon Affiliate Link): https://www.amazon.com/dp/B09JBVR5B4?tag=nextlevelmac-20
The RØDE PSA1+ uses internal damping to move silently when you adjust position, which means no mechanical noise transfers into your recording. The parallelogram spring design keeps your microphone aimed consistently as you raise or lower it. Cable management clips run along the arm, keeping your USB cable organized and out of frame if you're recording video simultaneously.
Noise Reduction and Audio Cleanup
GarageBand includes a noise gate that cuts audio when your voice drops below a certain volume. This removes room tone, computer fan noise, and other ambient sounds between your words. Click the plugin button on your voice track, choose Gate from the dynamics section, and adjust the threshold until background noise disappears while your voice passes through cleanly.
For noise that persists during speech, use the built-in equalizer to cut frequencies where the noise lives. Electrical hum sits around 60 Hz, air conditioning rumble lives between 100-200 Hz, and computer fan noise occupies 500-1000 Hz. Reduce these ranges carefully in the EQ, checking that your voice still sounds natural after the cuts.
Exporting Your Finished Podcast
When your episode is complete, choose Share then Export Song to Disk. Select MP3 as the format for the best combination of quality and file size. Most podcast hosting platforms prefer 128 kbps for spoken word, which GarageBand offers as a preset. Higher bitrates like 256 kbps work if you have music-heavy episodes, but they create larger files that take longer to download for listeners.
GarageBand adds ID3 tags to your exported file, which are metadata fields that podcast apps display. Fill in the episode title, show name, and episode number before exporting so this information appears correctly when people play your podcast.
Building a Consistent Workflow
Create a template project with your standard settings, tracks, and plugins already configured. Record your first episode, delete all the audio regions but leave the tracks and settings, then save it as a template. Each new episode starts with this template, eliminating setup time and ensuring consistency across episodes.
Develop a checklist for each stage of production. Before recording: test microphone levels, close notification apps, disable phone calls. During recording: maintain consistent distance from microphone, pause and restart rather than trying for perfect takes. During editing: remove mistakes, add music, adjust levels, export file. Checklists prevent you from forgetting steps when you're recording episode fifty and the process feels automatic.
Advanced Techniques for Better Sound
Ducking automatically lowers music volume when you speak. GarageBand calls this sidechain compression. Select your music track, add a compressor plugin, and set it to trigger from your voice track. When your voice appears in the timeline, the music dips. When you stop speaking, the music comes back up. This technique keeps music present without forcing you to manually adjust levels throughout the episode.
Multiband compression targets specific frequency ranges independently. If your voice has excessive sibilance in the 6-8 kHz range, a multiband compressor reduces just that range while leaving the rest of your voice untouched. GarageBand's compressor can split into bands through its advanced settings, though you'll need to experiment with the controls to dial in the right balance.
Room Treatment Beats Software Fixes
Recording in a treated space produces better results than trying to fix a bad recording later. Hang blankets or acoustic panels on walls near your recording position to absorb reflections. Record in a closet full of clothes if you don't have a dedicated space. The fabric dampens echo and creates a drier, more professional sound.
Avoid recording near hard surfaces like windows, bare walls, or desks pushed against walls. These surfaces reflect sound back into your microphone, creating a hollow, distant quality that EQ can't fix. Even a bookshelf behind you helps by scattering reflections instead of bouncing them directly into the microphone.
The Reality of Podcast Production on Mac
GarageBand won't limit your podcast quality. The software has enough power and features to create episodes that sound like they came from expensive studios. Your main constraints are microphone quality, recording environment, and technique. Master these three elements, and listeners won't care what software you used.
Professional podcasters often start with GarageBand and move to Logic Pro or other software years later, not because GarageBand couldn't handle their needs, but because they wanted specific advanced features for complex productions. If you're making a standard interview podcast, a solo show, or even a narrative series with multiple voices and sound design, GarageBand does the job.
Your Mac already has everything needed to start producing podcasts today. Open GarageBand, connect a decent microphone, and begin recording. The technical barriers that once kept people from podcasting have disappeared. What remains is the actual work of showing up consistently and making content people want to hear.

Related Posts
Mac Audio Interfaces: Transform Your Recording Setup
Jan 06, 2026
Mac Color Calibration for Photographers and Designers
Dec 27, 2025
Speed Up Your Mac Video Editing: The External SSD Setup Guide
Dec 22, 2025