Whether you're running a MacBook Pro, MacBook Air, or Mac mini, expanding to multiple displays changes how you work. You get more screen real estate for research, design, coding, or just keeping Slack open while you focus. But getting it right means understanding what your Mac supports, choosing the right hardware, and configuring macOS Tahoe properly.
Start by Understanding Your Mac's Display Limits
Your Mac's display capabilities depend entirely on which chip powers it. M1 and M2 base models support one external display in addition to the built-in screen. M3 base models push that to two external displays. The Pro, Max, and Ultra variants support even more.
Check your About This Mac settings to confirm your chip. Go to the Apple menu, select About This Mac, and note whether you have a base M-series chip or a Pro/Max variant. This determines whether you need workarounds like DisplayLink technology or can connect displays directly.
For M1 and M2 base MacBooks that natively support only one external display, a DisplayLink dock unlocks the ability to run dual displays. These docks use software drivers rather than relying solely on your Mac's native display engine.
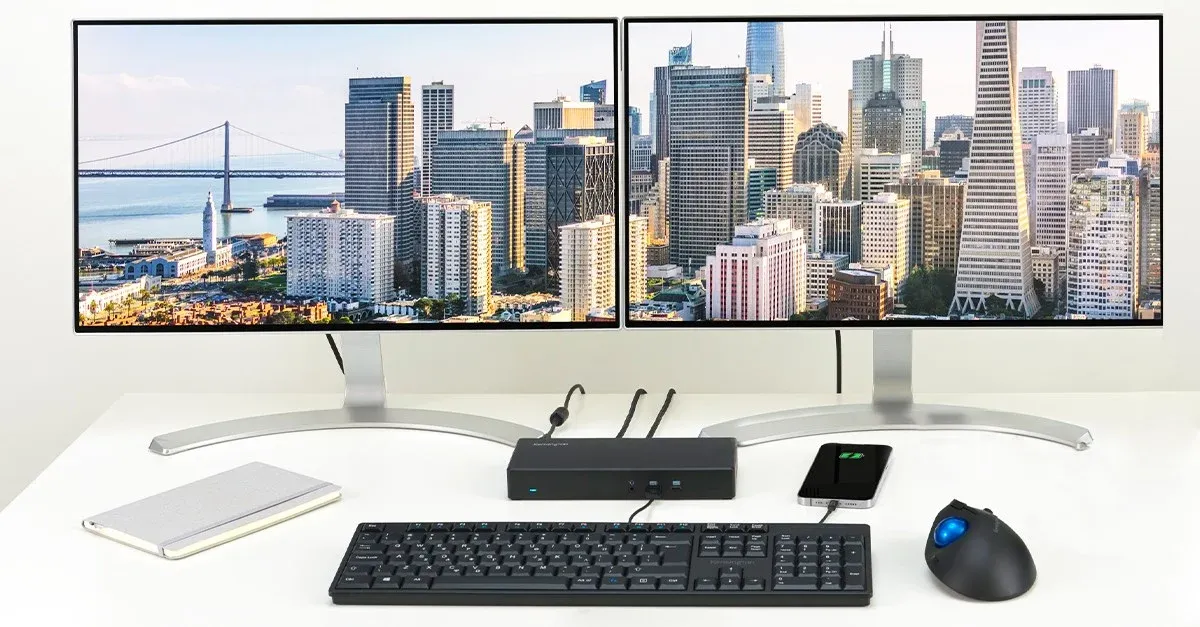
Choose a Thunderbolt Dock That Handles Everything
A proper Thunderbolt dock transforms your Mac workspace. Instead of juggling dongles and adapters, you connect one cable to your Mac and instantly access displays, peripherals, ethernet, and power delivery.
The CalDigit TS4 remains the gold standard for Mac users who want maximum connectivity without compromise. It delivers 98W of power delivery to charge your MacBook while you work, includes 18 ports of connectivity, and supports dual 4K displays at 60Hz for M1 Pro, Max, and Ultra Macs. You get three Thunderbolt 4 ports, eight USB ports at full 10Gbps speed, 2.5 gigabit ethernet, SD and microSD card readers, and separate audio jacks.
Where to buy the CalDigit TS4 Thunderbolt 4 Dock https://www.amazon.com/dp/B09GK8LBWS?tag=nextlevelmac-20&gbOpenExternal=1
Affiliate disclosure: some links in this article are Amazon Associate links. If you buy through them, Next Level Mac may earn a small commission at no extra cost to you, and we only recommend products that genuinely bring value to your Apple setup.
Set the dock on your desk or mount it underneath using an aftermarket bracket. Connect your Mac with the included Thunderbolt cable, plug in your displays, and you're running. The TS4 works with M-series and Intel Macs, adapting to whatever host computer connects to it.
Position Your Displays at the Right Height and Angle
Display placement affects your comfort more than you might expect. Your primary display should sit at arm's length with the top of the screen at or slightly below eye level. This reduces neck strain during long work sessions.
For dual displays, position them side by side with minimal gap between bezels. macOS Tahoe remembers display arrangements, so set them up once in System Settings under Displays and they'll maintain position even after disconnecting and reconnecting.
If you're using a MacBook as part of your setup, decide whether to use it as a third display or run it in clamshell mode with the lid closed. Clamshell mode requires an external keyboard and mouse but gives you a cleaner desk and forces you to focus on the external displays rather than defaulting to the laptop screen.
Configure Display Settings in macOS Tahoe
Open System Settings and navigate to Displays. You'll see a visual representation of your connected displays. Drag them to match your physical arrangement. This affects how your cursor moves between screens.
Click each display to access resolution and scaling options. For 4K displays, the default scaled resolution typically looks best. True 4K native resolution makes text tiny, while the scaled options use Retina rendering to keep things sharp but readable.
Set which display serves as your primary by dragging the white menu bar to the display you want. Your Dock appears on the primary display by default, though you can configure it to show on all displays in Dock settings.
Optimize Your Workspace Layout for Multiple Displays
Think about which apps belong on which screen. Put communication apps like Slack, Messages, and Mail on your secondary display. Keep your primary display for whatever demands focus: code, design work, documents, or media.
macOS Tahoe introduces improved window management. Hover over the green window button to see tiling options. You can snap windows to halves or quarters of the screen, which works particularly well on large displays.
Use Mission Control to create separate Spaces for different types of work. Swipe up with three fingers on your trackpad or press Control-Up Arrow to see all Spaces. Create a new Space by moving your cursor to the top-right corner and clicking the plus button. Assign specific apps to specific Spaces so they always open in the same location.
Stage Manager, introduced in macOS Ventura and refined in Tahoe, provides another way to organize windows. Enable it in Control Center and groups of related windows cluster together on the left side of your display. You can quickly switch between different work contexts without losing track of open windows.
Add Desk Accessories That Complete the Setup
An external keyboard and mouse or trackpad make a Mac desk setup feel complete. Apple's Magic Keyboard and Magic Trackpad match the aesthetic of your Mac and support all macOS gestures.
For mechanical keyboard fans, options like the Keychron K-series provide excellent typing feel with Mac-specific layouts. Look for keyboards with Mac modifier keys printed on the keycaps rather than Windows-style Alt and Win keys.
Cable management matters more with multiple displays. Use cable raceways, clips, or a cable sleeve to keep Thunderbolt cables, display cables, and power cords organized under your desk. The cleaner your desk looks, the better your workspace feels.
A monitor arm frees up desk space and provides ergonomic adjustability. Mount one or both displays on arms and you can adjust height, tilt, and depth throughout the day as your sitting posture changes.
Test Your Setup Under Real Workload
Open the apps you actually use and see how the setup performs. Run Safari with multiple tabs, open your design software, start a video call, and check whether everything remains smooth. If you notice lag or stuttering, check Activity Monitor to see if any process consumes excessive CPU or memory.
Display lag rarely happens with Thunderbolt docks, but if you experience it, try disconnecting and reconnecting the dock, or restart your Mac with the dock connected. Some M1 and M2 Macs benefit from a firmware update to the dock itself.
The investment in a proper multi-display setup pays off immediately through improved productivity and comfort. You'll wonder how you worked with a single screen once you've experienced the freedom of spreading your work across multiple displays.

Related Posts
Finder Quick Actions in macOS Tahoe Automate File Tasks Instantly
Jan 12, 2026
Master Pixelmator Pro: The Ultimate Mac Photo Editor Guide
Dec 10, 2025
Keka: The Best Mac File Compressor
Dec 10, 2025